


INSTALLATION & OPERATIONAL SGLV MANUAL
24
L20-407 rev.1 (3/14)
8
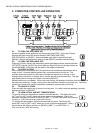
5.20. CONTROL OR TIMER: (RIGHT SIDE OF DUAL VAT)
Note: This key has no function of single vat controls.
With display showing [PROGRAM], press the product key [0].
Display shows [SELECT] [OPTIONS].
Press product key 8; display will show [CONTROL].
Use the product key [0] to scroll through choices (Control, Timer).
Press [P] key to save choice. Display shows [PROGRAM].
Note: If timer is selected, heat control outputs are disabled, leaving only the timer
functions active. Do not make this selection on Solstice fryer models.
5.21. OTHER DISPLAYS:
[PROBE OP] [OPEN]
Open probe detection is standard on all Pitco controls. If probe is detected open, normal heating and
cooking activities are suspended.
[HIGH TMP] [HIGH TMP]
This display warns operators that the vat temperature has exceeded set temperature by 40°F (22°C), or
an absolute maximum of 410°F (210°C). This display does not show the status of the mechanical high
limit switch.
[DRAINING] [TURN OFF]
This message indicates that the drain valve has been opened, the vat is assumed to be empty by the
controller. Normal heat control activities are suspended. To restore to normal operation, close the drain
value. Display will show [TURN OFF] [TURN OFF].
Turn controller off, and refill the vat. Continue with normal operations at (See section 4.6).
[HEAT] [FAILURE] OR [IGNITION] [FAILURE]
This message indicates that the heating system failed to respond. Typically, the high temperature limit
switch has tripped and is in need of resetting. In the case on gas fired appliances, this message will
display if the pilot fails to light or is detected marginal by the ignition module.
[SYSTEM] [FAILURE]
This message indicates a shorted probe. If probe is detected as a short circuit normal heating and
cooking activities are suspended.
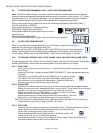
5.22. COMPUTER SHUTDOWN
Press and hold the computer control
button to turn the fryer OFF. Refer to section 6.5 for complete
appliance shutdown instructions.
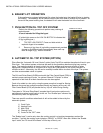
5.23. FLUSH HOSE OPERATION (IF EQUIPPED)
The cooker tank can be rinsed cleaned by using a filter flush hose (if equipped). Refer to the
following procedure to operate the filter flush hose.
1. Turn the appliance OFF.
2. Pull the blue drain handle down to drain oil/shortening from the cooker tank into the filter pan.
3. Connect the filter flush hose to the quick connecting fitting.
4. Point the filter hose nozzle outlet into the cooker tank.
5. Pull the yellow handle to turn the pump on and allow oil/shortening to flow through the flush
hose.
6. To refill the tank, lift the blue drain handle up.
7. When the tank has completed filling, push the yellow handle to deactivate the pump.