


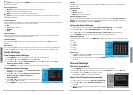


14
Basic Operation
15
Advanced Settings
Advanced Settings
Picture Settings
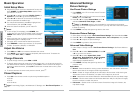
Use Preset Picture Settings
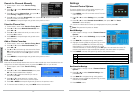
1. Press MENU on the TV or remote control. The main
menu displays.
2. Press or on the TV or remote control to select
Picture, then press OK or .
3. Press or to highlight Picture Mode, press ,
and select Standard, Vivid, Bright, or User.
n Note: The Standard setting is recommended for most viewing environments.
Depending on the ambient light level in the room, you may find one of the other options
is better for viewing.
4. Press MENU to accept changes and go back to the menu.
Customize Picture Settings
1. Follow Steps 1 through 4 under “Use Preset Picture Settings.” Set Picture Mode to User.
2. Press or to select Brightness, Contrast, Color, Tint or Sharpness, then press .
3. Press or to adjust the picture settings.
4. Press MENU to go back to the previous menu.
Advanced Video Settings
1. Follow Steps 1 through 4 under “Use Preset Picture Settings.” Set Picture Mode to
User.
2. Press or to select Advanced Video. Press OK
or to go to the next screen.
3. Press or to select Aspect Ratio, Color
Temperature, Noise Reduction, 3D Y/C, Gradient
Enable, or Blue Screen, then press or to
adjust settings (explained below).
4.
Press MENU to accept changes and go back to the
previous menu.
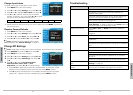
Aspect Ratio
Normal – Recommended for viewing content broadcast in 4:3 wide screen. Adds black
bars on either side of the image to avoid image distortion.
Zoom – Stretch an image vertically and horizontally to fill the screen while viewing 4:3
wide screen content. No distortion, but parts of the image may be cut off.
Wide – Stretch some 4:3 content. Reduces or eliminates black bars, but may distort image.
Cinema – Fills the entire screen and eliminates black bars. May cut off parts of images,
but will not distort or stretch the picture.
Full Screen – Stretch some 4:3 or 16:9 content. Stretch the image to full screen, but
may distort image.
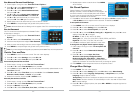
Basic Operation
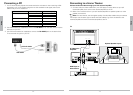
Initial Setup Menu
1. Plug the TV’s power cord into a standard AC outlet, then
press POWER. The Initial Setup Menu appears when
you first turn on the TV.
2. Press or to select a language: English, French, or
Spanish and press to go to the next setting.
3. Press or to select Air for over-the-air broadcast or
Cable for paid cable or satellite input.
4. For over-the-air broadcasts, press
to highlight Auto
Channel Search, then press to begin.
5. When the search completes, you can watch TV.
nNotes:
To turn off the TV completely, press POWER, then
unplug the TV. To put the TV in standby mode, just press
POWER. Weak electric power is consumed in standby
mode.
After 5 minutes with no signal or a blank screen, the TV
automatically goes to standby mode.
See page 18 for manual channel search instructions.
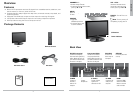
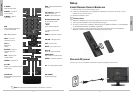
Press SOURCE to select input sources: TV, Composite,
S-Video, Component, VGA/PC, or HDMI/DVI.
Adjust the Volume
Press VOL+ and VOL– to increase or decrease the volume.
Press MUTE on the remote control to temporarily silence the sound. To restore the
sound, press VOL+, VOL–, or MUTE.
Change Channels
To cycle through channels, press CH or CH.
To directly select a channel, press the number buttons and – on the remote control for
the desired channel. Wait for 5 seconds, or press OK to confirm the channel change. For
example, to select channel 5, press 5, OK. To select the multicast channel 22-1, press
2 2 – 1 OK.
To switch between the current and previous channel, press
f
.
Closed Captions
Press CC on the remote control to cycle through available captions:
•CCOff
•CCOn
•CCOnMute
n Note: To set Analog, Digital , and Advanced CC Settings, see “Set Closed Captions” on
page 21.