


RR1 • 13
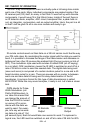
TESTING THE RR1
To begin testing the RR1 we will need the following items:
AC power supply (6 to 12VAC) or DC power supply (8 to 14VDC).
A known functional IR remote control.
A mating piece of equipment that the remote control works with.
Begin by positioning the IR LED in front of the equipment you intend to con-
trol. To hold the IR LED in place, try using a piece of electrical tape. It works
well for testing and it normally doesn’t leave any residue on your valuable toys
when you take it off! Otherwise mount it into position where you will be using it
from now on and we’ll go for broke. Note the LED lens works much like a
flashlight and is fairly directional. If you need a broad distribution of IR light, a
piece of wax paper over the lens will diffuse the IR LED to cover a broader
area. This is a poor man’s frensel lens!
Make sure the RR1 is powered off. Use your body to block the normal path
of your remote control to the equipment and verify that you cannot activate
components. Sometimes the walls near you will reflect enough IR for the
equipment to detect so it would be hard to verify if the RR1 is working. Now
turn on the RR1 and press some remote control buttons. You should see the
green LED on the RR1 flash with the remote signal while at the same time the
equipment under control follows your every command!
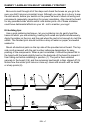
Now that you know the unit is working, let’s finish the job by permanently
shrinking the protective tubing over the leads of the IR LED for added struc-
tural support.
28. Use a heat gun on a low heat setting (or a hair drier) to carefully shrink
the 1/8” tubing to size over the leads of the IR LED. A soldering iron may
also be used to shrink the tubing by holding it close to the tubes, make
sure you don’t directly contact the tubing however. These will keep the
leads of the IR LED from shorting together.
29. Now slide the larger 1/4” tubing over the rear leaded end of the IR
LED for added support. The clear IR LED body should stick out of the tub-
ing by about 3/8” or so. The tubing will reduce the stress on the IR LED
lead wires when it is shrunk around with the smaller 1/8” pieces.
30. Use the heat gun again on a low heat setting (or a hair drier) to care-
fully shrink the larger tubing to size. It should shrink fairly tightly over the
whole assembly.
There really isn’t much more to it than that so let’s start using the RR1!