


21
This is normal with Closed Captioning, especially
with live programs. This is because during live
programs, captions are also entered live. These
transmissions do not allow time for editing.
When Captions are being displayed, on-screen
displays, such as volume and mute may be seen
but may interfere with Closed Captions.
Some cable systems and copy protection systems
may interfere with the Closed Captioned signal.
If using an indoor antenna or if TV reception is
very poor, the Closed Caption Decoder may not
appear or may appear with strange characters or
misspelled words. In this case, adjust the antenna
for better reception or use an outdoor antenna.
CC advanced
When you have selected Custom as the display
method, you can adjust the various setting listed
below as follows:
This feature is designed to customize Digital Captions
only.
1
Press SETUP/TV MENU in the digital channel.
The TV menu screen will appear.
2
Press ▲ or ▼ to select “Setup”, then press ▶ or
ENTER.
3
Press ▲ or ▼ to select “Closed Caption”, then
press ▶ or ENTER.
The Closed Caption menu will appear.
4
Press ▲ or ▼ to select “Digital CC Preset”, then
press ◀ or ▶ to select “Custom”.
5
Press ▲ or ▼ to select “CC Advanced”, then
press ▶ or ENTER.
The CC Advanced menu will appear.
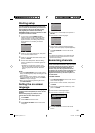
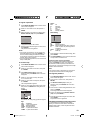
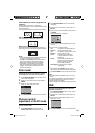
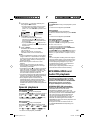
6
Press ▲ or ▼ to select the desired item, then
press ◀ or ▶ to change the setting.
CC Advanced
Text Size Auto
Text Type Auto
Text Edge Auto
Text Color Auto
Text Opacity Auto
Background Color Auto
Background Opacity Auto
: Adjust
: Select
You can select from among the following items
and parameters.
Text Size: Auto, Small, Standard, Large
Text Type: Auto, Style1, Style2, Style3, Style4,
Style5, Style6, Style7
Text Edge: Auto, None, Raised, Depressed,
Uniform, Left Shadow, Right
Shadow
Text Color: Auto, Black, White, Red, Green,
Blue, Yellow, Magenta, Cyan
Text Opacity: Auto, Solid, Transparent,
Translucent, Flashing
Background
Color:
Auto, Black, White, Red, Green,
Blue, Yellow, Magenta, Cyan
Background
Opacity:
Auto, Solid, Transparent,
Translucent, Flashing
•
•
•
7
Press EXIT/CANCEL to return to the normal
screen.
NOTE:
You cannot set both “Text Color” and “Background
Color” as a same color.
You cannot set both “Text Opacity” and “Background
Opacity” to “Transparent”.
Adjusting the picture
preference
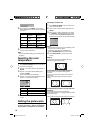
You can select four picture modes—Sports,
Standard, Movie and Memory—as described in
the following table:
1
Press SETUP/TV MENU in the TV mode. The TV
menu screen will appear.
2
Press ▲ or ▼ to select “Picture”, then press ▶ or
ENTER.
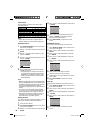
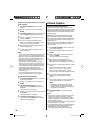
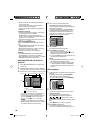
3
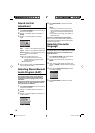
Press ▲ or ▼ to select “Picture Preference”.
4
Press ◀ or ▶ to select a mode you want to adjust.
On
PC Setting >>
DNR On
Picture
Picture Setting >>
Picture Preference Sports
Picture Size >>
Film Mode
: Adjust
: Select
Mode Picture Quality
Sports
Bright and dynamic picture (factory-set)
Standard Standard picture quality (factory-set)
Movie Movie-like picture setting (factory-set)
Memory Your personal preferences (set by
you; see “Picture control adjustment”
below).
5
After your desired setting, press EXIT/CANCEL
to return to the normal screen.
Picture control adjustment
1
Press SETUP/TV MENU in the TV mode. The TV
menu screen will appear.
2
Press ▲ or ▼ to select “Picture”, then press ▶ or
ENTER.
3
Press ▲ or ▼ to select “Picture Setting”, then
press ▶ or ENTER.
The Picture Setting menu will appear.
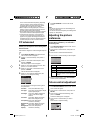
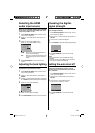
4
Press ▲ or ▼ to select the item you want to
adjust.
Press ◀ or ▶ to adjust the setting.
Brightness
Contrast
Sharpness
Color
Tint
Color Temperature Cool
Picture Setting
25
50
25
25
16
0
: Adjust
: Select ENTER:Set
Backlight
•
•
52D0201A_EN.indd 2152D0201A_EN.indd 21 6/12/09 1:44:33 PM6/12/09 1:44:33 PM