


Controls and Functions
Runco LS-HB/LS-HB Ultra Installation/Operation Manual 11
PRE
L
IMINAR
Y
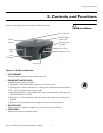
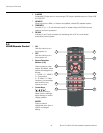
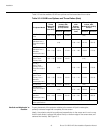
5. Aspect Ratio Selection Button
Press this button repeatedly to select one of the following aspect ratios:
16 : 9: For viewing 16:9 DVDs or HDTV programs in their native aspect ratio.
Letterbox: For viewing LaserDisc movies or non-anamorphic DVDs on a 16:9
screen.
4 : 3: Scales the input signal to fit 4:3 sources in the center of the screen.
4:3 Narrow: Scales the input signal to fit 4:3 sources in the center of the screen when
using an anamorphic lens.
Native: Displays source image in its native resolution without re-sizing or overscan.
6. MENU
Press this button to show or hide the OSD controls.
7. Memory Preset Buttons (M1 / M2 / M3)
Press to recall settings for the current input from one of three memory presets. By
default, these buttons are assigned as follows: M1 = User Memory 1; M2 = User
Memory 2; 3 = ISF Night. However, you can assign each button to any memory
preset you wish.
8. Picture Adjustment Buttons:
Contrast
Press to adjust white level.
Brightness
Press to adjust black level.
Sharpness (SHARP)
Press to adjust sharpness.
Gamma (GAMMA)
Press to select a gamma curve.
Overscan (OS)
Press to select an overscan mode.
Noise Reduction (NR)
Press to adjust noise reduction level.
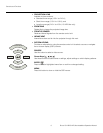
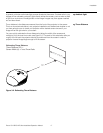
9. LIGHT
Press momentarily to activate remote backlighting. Press and hold for five (5) seconds
to illuminate the projector rear panel, to facilitate connecting cables in a dark room.
10. Picture-In-Picture (PIP) Controls:
PIP
Press repeatedly to activate/deactivate PIP mode or select the desired PIP image
source.
SWAP
Press to swap the PIP image with the active source image.