English - 38
Printing the Photo Image
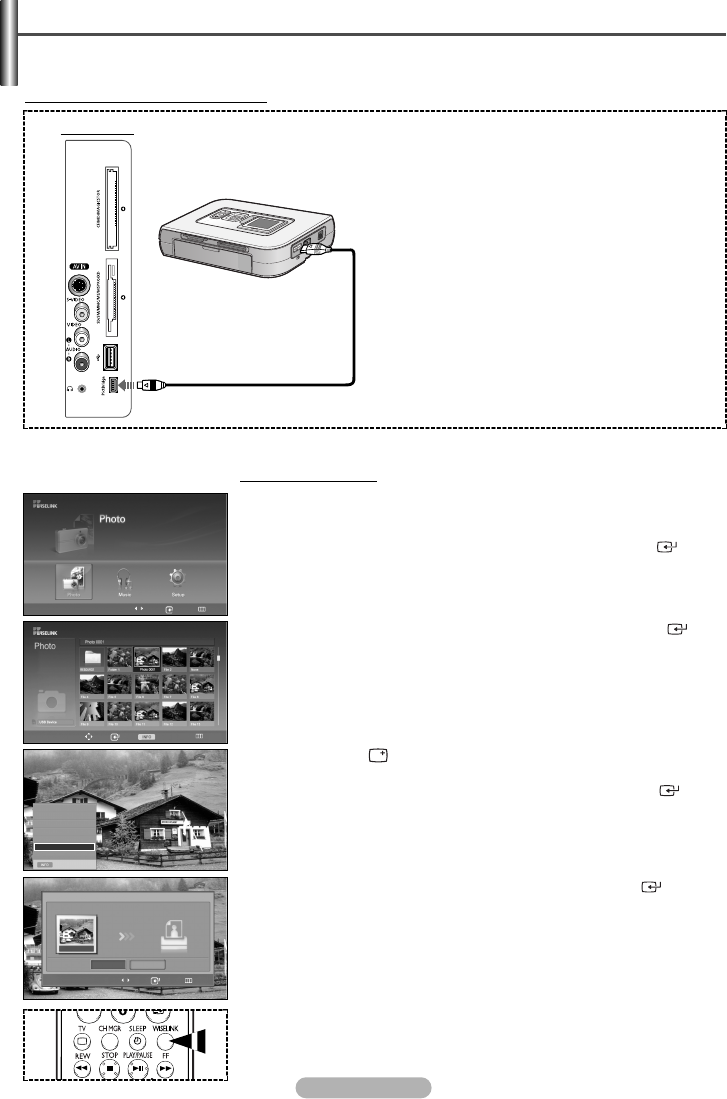
By connecting the TV to printers with PictBridge support (sold separately), you can send photo images from the
memory device directly to the printer with a few simple operations.
T
o Connect a Printer Using a USB Cable
Side Panel
USB Cable
PictBridge-supporting
Photo Printer
T
o Print a Photo Image
Move Enter Return
Move Enter Photo Menu Return
219x171
6 KBytes
May 05,2006
3/130
Move Enter Return
Yes
Photo0001
No
Exit
Slide Show
Rotate
Zoom
Copy
Delete
Print
List
1 After switching the mode to WISELINK, select a memory device that you
have installed. (Refer to page 29)
2
Press the
œ or √
button to select Photo, then press the
ENTER ()
button. JPEG files and existing folders are displayed.
3
Press the
…
/
†
/
œ
/
√
buttons to select a file, then press the
ENTER ()
button.
➢
Pressing the button over a photo icon shows the currently selected
photo in full screen.
➢
Pressing the button over a folder icon shows the JPEG files included in
the folder.
4
Press the
INFO ()
button to display the option (Slide Show, Rotate,
Zoom, Copy, Delete, Print, List).
Press the
… or †
button to select Print, then press the
ENTER ()
button.
5
Press the
œ or √
button to select Yes, then press the
ENTER ()
button.
The selected photo image will be printed.
To exit WISELINK mode, press the WISELINK button on the remote control.
➢
Note that the edge of the image might be cut and may not be printed
depending on your printer model.
➢
The printed image may be smaller than the original size.
Œ
Turn your printer power off.
´
Connect an USB cable (sold separately)
between the PictBridge jack on the TV
and the USB jack on the printer.
ˇ
Turn your printer’s power on.
œœ
1/10 Page
√√
Print
Do you want to print the file?
➢
Press the WISELINK button on the remote control to turn on the WISELINK
mode.
➢
Some printers supporting PictBridge may not be compatible with this TV.
BN68-00990V-03Eng_0824 8/26/06 4:25 PM Page 38
