17
Hookups and Settings
D Audio L/R (left/right) output jacks
This connection will use your TV’s or audio
component’s two speakers for sound.
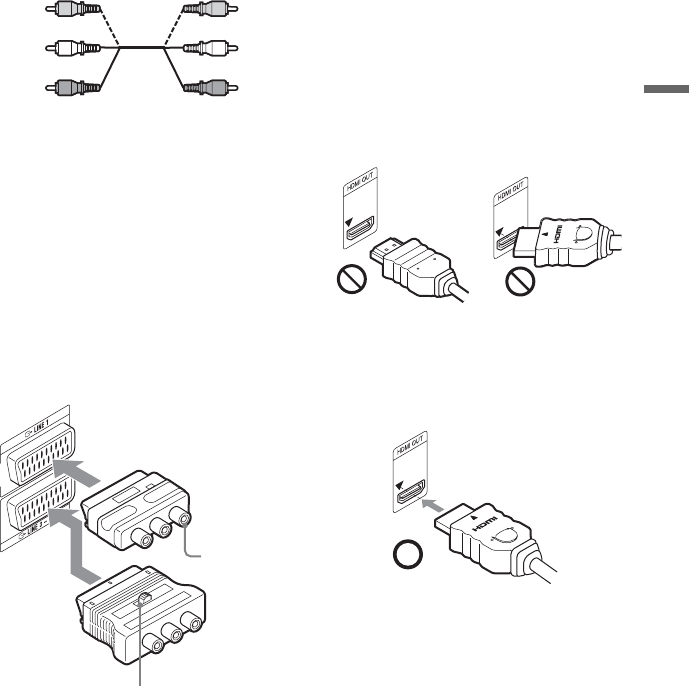
To connect the EURO AV adapter
Two types of EURO AV adapters are
supplied with the recorder; with selector
(big) and without selector (small).
Connect the EURO AV adapter with
selector (big) to the LINE 3 – TV jack, and
the EURO AV adapter without selector
(small) to the LINE 1 jack.
When connecting the EURO AV adapter
with selector, set the selector on the EURO
AV adapter to the “OUTPUT” position to
view pictures.
When connecting to the HDMI jack
Follow the steps below. Improper handling
may damage the HDMI jack and the
connector.
1 Carefully align the HDMI jack on the
rear of the recorder and the HDMI
connector by checking their shapes.
Make sure the connector is not upside
down or tilted.
2 Insert the HDMI connector straight into
the HDMI jack.
Do not bend or apply pressure to the
HDMI connector.
b
• Be sure to disconnect the HDMI cable when
moving the recorder.
• Do not press the recorder against the cabinet wall
when you place the recorder in a cabinet with the
HDMI cable connected. It may damage the
HDMI jack or the HDMI cable.
• Do not twist the HDMI connector while
connecting to or disconnecting from the HDMI
jack to avoid damaging the HDMI jack and
connector.
When playing “wide screen” images
Some recorded images may not fit your TV
screen. To change the picture size, see page
75.
If you are connecting to a VCR
Connect your VCR to the LINE 1 jack on the
recorder (page 23).
White
(L)
White
(L)
Red (R)
Red (R)
EURO AV
adapter with
selector to the
LINE 3 – TV jack
The red plug
at right
EURO AV adapter
to the LINE 1 jack
Selector side facing up
Set the selector to the
“OUTPUT” position.
Not straightConnector is upside
down
,continued


