


18 Chapter 3: Connecting Your System
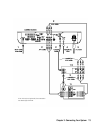
Home Entertainment System
(Hi-Fi TV, Hi-Fi VCR, Audio/Video Receiver)
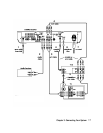
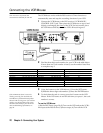
Refer to the illustration on the opposite page (SAT-A2 receiver is
pictured).
1 Connect the RG-6 cable from the satellite antenna’s LNB to the DSS
receiver’s SATELLITE IN jack.
2 Connect the DSS receiver’s A/V jacks to the VCR and A/V
receiver’s A/V IN jacks.
3 Connect the VCR’s A/V OUT jacks to one set of the A/V receiver’s
A/V IN jacks.
4 Connect the A/V receiver’s MONITOR OUT jack to the TV’s
VIDEO IN jack.
5 Connect one end of the telephone line cord to the DSS receiver’s
TEL LINE jack. Connect the other end to your home’s modular
telephone outlet.
6 Connect one end of the AC power cord to the DSS receiver’s AC IN
jack. Connect the plug end to an AC outlet.
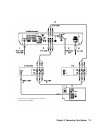
Optional Connections
Some VCRs label this jack RF IN,
instead of VHF/UHF IN.
If you have a cable input, cable box, or a terrestrial TV antenna,
connect it to the VCR’s VHF/UHF IN jack.
Best Connection: If your A/V receiver has an S-VIDEO jack, use an
S-VIDEO cable to connect the DSS receiver’s S-VIDEO jack to the
A/V receiver’s S-VIDEO IN jack. Then connect an S-VIDEO cable
from the A/V receiver to the TV’s S-VIDEO IN jack. This provides
the best picture quality. Then use audio cables to connect one set of
the DSS receiver’s audio jacks to the A/V receiver’s AUDIO IN
jacks.
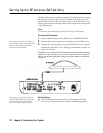
If you are using the VCR Mouse, see page 20 for setup instructions.
Note
If the screen appears fuzzy, the program you are watching may be protected by
Macrovision. Turn the VCR off to improve the picture quality.
In this configuration, the A/V receiver must be turned on in order to pass the
video signals through to your TV.