


23 (GB)
Using On-screen Menus
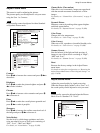
Sync Mode
Sets the mode according to the signal input at pin 13
of the RGB/YUV terminals of INPUT1 and INPUT2.
Signals can be set only to 575/50i or 480/60i.
H/Comp: When a horizontal signal or a composite
synchronous signal* is input
Video: When a video signal or a composite
synchronous signal* is input
*Depending on the level of the composite
synchronous signal, the image may not be displayed
correctly. In that case, change the Sync Mode
setting.
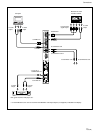
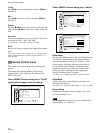
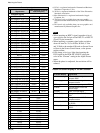
Input signal and Synchronous mode settings
PIN Signal input overthe D-sub
Synchronous
mode setting
480/60i, 575/50i Composite Video
Video signal
13 Composite Sync
Composite Sync
13/14 H Sync/V Sync
Synchronizing
2 Sync On Green
signal
Refer to “Pin assignment” on page 51 (GB) for information
on the pin assignments of the RGB/Y connectors of INPUT1
and INPUT2.
Notes
•When the unit is set to Synchronizing signals, an
image may be not displayed, even if a COMPOSITE
SYNC signal is input. In that case, change the
Synchronous mode setting.
• For the Sync Mode settings, INPUT1 and INPUT2
can be set independently, but if the unit is switched
to an input different from those called for in the
settings, the signal may not be output. In such a case,
change the Sync Mode settings to match the input
signal for each input connector, and then switch the
input signal.
• There are some inputs for which only synchronizing
signals can be selected. In this case, an image will
not be displayed even if a Video Signal is input
through the 13 pin connector. Input horizontal/
vertical synchronization signals through the 13 or 14
pin connectors, or input Sync On Green signals
through the RGB connector.
•With Sync On Green, if the unit is not set to accept
synchronizing signals, the image will not be
displayed.
• Sync Mode settings cannot be carried out using
option boards.
• This unit does not support three value sync of
composite sync and 576/60P.
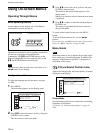
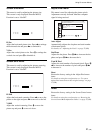
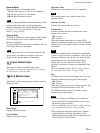
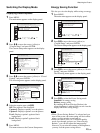
Initial Setup menu
Selects the language or signal source of the menu
display, functions of the menu key and so forth.
Initial Setup
Color Syst em :
MENU Func t i on : O n / O f f
set
,toselect, ,to
ENTER
Language : Engl ish
Language
Selects the on-screen language (Japanese, English,
German, French, Spanish or Italian).
For details, see “Selecting the On-screen Language” on
page 41 (GB).
Color System
Selects the input signal.
Auto: to display NTSC, PAL, SECAM/NTSC4.43
or NTSC/PAL-M/PAL-N signals
NTSC: to display NTSC signals
NTSC4.43: to display NTSC4.43 signals
PAL: to display PAL signals
SECAM: to display SECAM signals
PAL-M: to display PAL-M signals
PAL-N: to display PAL-N signals
PAL60: to display PAL60 signals
When the Color System is set to “Auto”, an additional
Color System capable of automatic detection is set in
the level below.
•Automatic detection of NTSC/PAL/SECAM/
NTSC4.43
•Automatic detection of NTSC/PAL-M/PAL-N
Note
This can only be set when a video signal is being
received.
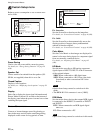
MENU Function
Selects the operation when the menu key is pressed.
On/Off: The menu display toggles between on and
off each time the menu key is pressed.
Return: The cursor returns to the previous level
each time the menu key is pressed.