


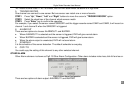

Digital Video Recorder User Manual
16
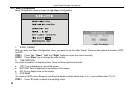
2. RECYCLE
If select "RECYCLE" check box to have continuous recording, DVR will overwrite the oldest record when HDD is full. If you
unselect "RECYCLE" check box, the DVR will stop recording when the HDD is full.
3. TIME STAMP
If selecting the check box, record time will be displayed on the bottom of screen when playing back the record.
4. PRERECORD TIME
Prerecord time is the record time before alarm. There are two options to choose: 5 seconds and 10 seconds.
5. CHANNEL
STEP1 Press "Up", "Down", "Left" and "Right" buttons to move the cursor.
STEP2 Press "Enter" key to switch the channel which you want to set.
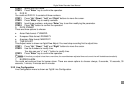
6. VIDEO QUALITY
There are five options to choose: lowest, lower, medium, higher and highest. Higher picture quality is, the picture is clearer.
And the rate of using HDD is larger.
7. AUDIO
If you select "AUDIO" check box, DVR will record audio when it records video. Otherwise it will not record audio.
Notice: When you playback the record, you can press "AUDIO" button to switch the sound of corresponding channel.
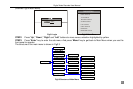
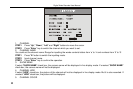
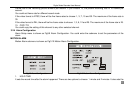
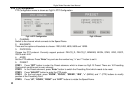
8. SCHEDULE RECORD
Setting of the Schedule Record is shown as Fig3.8 Schedule Setup.
STEP1 Press "Up", "Down", "Left" and "Right" buttons to move the cursor to "SCHEDULE RECORD" option in the
Record Configuration menu.
STEP2 Select "SCHEDULE RECORD" check box.
STEP3 Press "Setup" button to enter the Schedule Setup menu.
Press "ESC" button on the front panel to get back to upper menu.
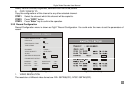
STEP4 In the Schedule Setup menu, press "Up", "Down", "Left" and "Right" buttons to move the cursor.
STEP5 Press "Enter" key to enter the time set.
STEP6 Press "+" and "-" buttons on the front panel to modify the time.
STEP7 Press "Enter" key to confirm the setup.
On weekday and holiday, you can select record whole day or set four periods of time to record.
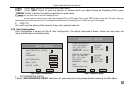
9. FRAME RATE SETUP