Teledyne Analytical Instruments
13
3. Gripping the entire analyzer, carefully turn over the analyzer and place it face-up
on the flat surface.
4. Carefully remove the top half of the analyzer and place it face-down and to the
right of the bottom half.
5. To close the analyzer, carefully place the top half of the analyzer on top of the
bottom half. Ensure that all tubing and wiring is tucked inside the case. Ensure
that the seal gasket is in place. Check for secure fit of the two halves.
6. Gripping the entire analyzer, carefully turn over the analyzer and place it face-
down on the flat surface.
7. Replace all six (6) screws into the back of the analyzer and tighten snug with a
phillips screwdriver.
Replacing the Oxygen sensor
Typically the oxygen sensor needs to be replaced every eight (8) to ten (10) months.
The following procedure is a step by step guide to replacing the oxygen sensor.
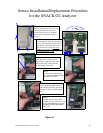
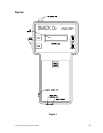
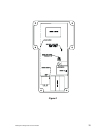
Refer to Figure “A”, Sensor Installation/Replacement Procedure for more detailed
information.
1. Open the analyzer (see Opening / Closing the Analyzer).
2. Carefully pull the oxygen sensor straight up out of the case.
3. Disconnect the ribbon cable from the top of the sensor by lightly spreading open
the two side ejector locks.
4. Gently pull the blue input tube off of the center sensor barb. Next, unscrew the
barb lock fitting off of the sensor sample exhaust output.
5. Discard used sensor.
6. Reconnect the ribbon cable to the top of the new sensor by gently pushing the
cable plug into the sensor socket until the two side ejector locks close.
7. Reconnect the blue sample tube to the center sensor barb and reconnect the
sample exhaust tube to the barb lock fitting.
8. Carefully place the oxygen sensor back down into the case. Make sure that the
sensor is pushed down towards the bottom of the case to prevent the sensor
from interfering with the top circuit board.
9. Close the analyzer (see Opening / Closing the Analyzer) and calibrate (see
Oxygen Calibration).


