


32
Function setup
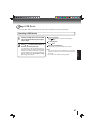
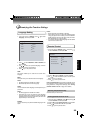
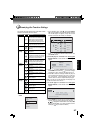
Customizing the Function Settings
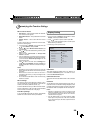
Speaker Setting
Once the speakers are connected to the system and properly
confi gured, you can check to verify that the connections
to the speakers are correct by running an audio speaker
test.
To run this test, follow the instructions described as below:
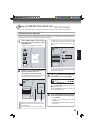
1. In the main menu of Settings, press
button, then use
/ button to select Speaker, then press OK.
Note: This setup menu item has no effect unless:
• If you have selected ‘Bitstream Mixed’ in the audio
menu, these menu choices will have no effect. (Each
channel’s full audio spectrum will be sent to each speaker,
regardless of the speaker size selected)
• If you don’t know the type of speakers attached to your
surround sound system, consult the manual for your
speaker system.
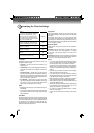
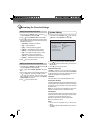
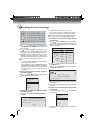
2. Use
/ / / to highlight the desired speaker, then
press OK to enter.
3. Press
/ to choose the desired audio signal, and then
press OK to confi rm.
Front Left & Right Speakers:
• By setting the front left speaker’s size, the front right
speaker’s size is automatically changed to match.
• The front speakers can not be turned off. They can only
be set to ‘Small’ or ‘Large’.
Selecting the “Auto” option turns on the Dynamic Range
Control for all BD movie soundtracks except Dolby TruHD. If
you have selected a TruHD track on the BD disc, the “auto”
selection tells the BD player to only turn on dynamic range
control if information embedded in the TruHD sound track
tells it to do so.
Stereo Downmix:
Select whether to downmix the multi-channel audio into
fewer channels.
• Auto — Downmixes the multi-channel audio into the
specifi c stereo that the connected equipment supports.
• Stereo (LoRo) — Downmixes the multi-channel audio
into two channel stereo. Choose when the Blu-ray disc
player is connected to the equipment that does not
support virtual surround function such as Dolby Pro
Logic.
• Surround Encoded (LtRt) — Downmixes the multi-
channel audio into surround compatible stereo. Choose
when the Blu-ray disc player is connected to the
equipment that supports virtual surround function such
as Dolby Pro Logic.
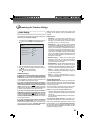
Center Speaker:
• If the front speakers have been set to small, the center
speaker can only be set to ‘Small’ or ‘Off’.
• Setting a speaker to ‘off’ will result in no sound being
delivered to that speaker.
Subwoofer:
• If you don’t know the crossover frequency of your
subwoofer, consult the manual for your speaker
system.
Surround Left & Right Speakers:
• By setting the left surround speaker’s size, the right
surround speaker’s size is automatically changed to
match.
• If the front speakers have been set to small, the surround
speakers can only be set to ‘Small’ or ‘Off’.
Rear Left & Right Speakers:
• By setting the left rear speaker’s size, the right rear
speaker’s size is automatically changed to match.
• If the front speakers have been set to small, the rear
speakers can only be set to ‘Small’ or ‘Off’.
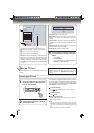
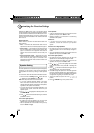
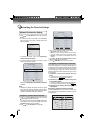
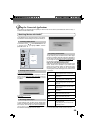
4. Use
/ / / to move the highlight box to the Test
button on the bottom, then press OK. A message will
appear.
5. Press
/ to choose the desired audio signal. You can
select between Pink, 1kHz Sine and White.
6. Press OK to begin the speaker test. The audio signal will
be sent to a different speaker every approximately every
two seconds. The audio test will highlight which speaker
is supposed to be getting the sound on the screen.
7. To stop the audio test, press one of the
/ / /
buttons.
8. Press
or RETURN to go to the previous menu.