


Vidikron Vision Model 10/Model 12 Owner’s Operating Manual 55
PRE
L
IMINAR
Y
6.1
RS-232 Connection and
Port Configuration
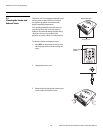
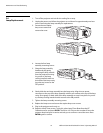
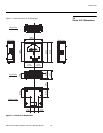
To interface the Vision 10/12 with a home theater automation/control system or a PC
running terminal emulation software, connect it to your control system or PC as shown in
Figure 3-11.
Configure the RS-232 controller or PC serial port as follows: no parity, 8 data bits, 1 stop bit
and no flow control. Set the baud rate to 9600, to match that of the Vision 10/12 RS-232 port.
6.2
Serial Command Syntax
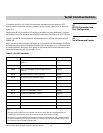
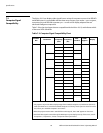
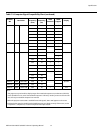
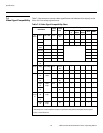
Table 6-1 lists the RS-232 command set. All commands are in ASCII format and must be in
UPPERCASE.
When you send a valid command, the Vision 10/12 executes it and acknowledges it with the
first three characters of the command followed by “OK;” for example, RRAOK. When you send
an invalid command, the Vision 10/12 ignores it and returns the first three characters of the
command followed by “NG;” for example, RRXNG.
6Serial Communications
Table 6-1. Serial Commands
Command Description Reply
RRA00 Saves current settings to the CUSTOM 1 memory
(Note
1)
RRAOK
RRA01 Saves current settings to the ISF Day memory (Note 1) RRAOK
RRA02 Saves current settings to the ISF Night memory
(Note 1)
RRAOK
RRB00 Recalls the Custom 1 memory settings RRBOK
RRB01 Recalls the ISF Day memory settings RRBOK
RRB02 Recalls the ISF Night settings RRBOK
RRC00 Selects the S-VIDEO input RRCOK
RRC01 Selects the COMPOSITE VIDEO input RRCOK
RRC02 Selects the COMPONENT 1 input RRCOK
RRC03 Selects the COMPONENT 2 input RRCOK
RRC04 Selects the HDMI input RRCOK
RRC05 Selects the RGB input RRCOK
RRD00 Selects the ANAMORPHIC (16:9) aspect ratio RRDOK
RRD01 Selects the STANDARD (4:3) aspect ratio RRDOK
Notes:
1. All image quality settings must be made with the remote control. After the image adjustments are
complete, you can use these commands to store the settings in the selected memory.
2. The power on command (PON) will not provide an OK reply; it will instead reply with a random character.
For your automation system, simply ensure that you receive a character after the PON command. If you
do not get any reply after PON, send PON again.