


Installation
Vision Model 140/150 Installation/Operation Manual 49
PRE
L
IMINAR
Y
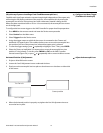
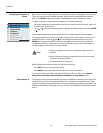
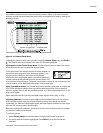
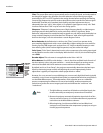
All available channels are listed in the Channel Setup menu (Figure 3-18), which describes
how each channel can be accessed and which serves as the gateway for editing, copying and
deleting channels.
Figure 3-18. Channel Setup Menu
To display the Channel Setup menu, press 3 or highlight Channel Setup and press ENTER or
. The Channel Setup menu appears with the active channel highlighted.
What Appears in the Channel Setup Menu: This menu lists all channels defined so far and
indicates where they are connected on the input panel.
The far-left column lists channel numbers currently defined. If a
channel has been assigned a name, that name appears in the
far-right column; otherwise, the horizontal and vertical
frequencies of the input signal appear here instead. Remaining
columns contain details pertaining to each channel setup, such
as its switcher number (always 0 = projector), slot location, a variety of icons indicating access
to each channel, and an abbreviated description of each signal type.
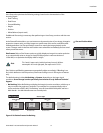
Signal Type Abbreviations: The Channel Setup menu identifies signal types in a shortened
form. These descriptors indicate what signal information the projector uses to identify a
match for a given channel, and are preceded by either an “i” (for interlaced signals) or “p” (for
progressive signals).
When used with the VHD Controller, the HDMI output signal is either “pDig” or “iDig.”
Unlocking Channels: Channels are pre-configured at the Vidikron factory for use with the
VHD Controller, and are locked to prevent the factory settings from being over-written
accidentally. For 1080i and 1080p digital signals, there are separate channels for each aspect
ratio and “ISF” memory preset (day and night).
Before proceeding with calibration, unlock the currently-active channel so that any changes
you make are stored in that channel.
To unlock a channel:
1. Select Channel Setup from the Main Menu to display the Channel Setup menu.
2. The active channel should be highlighted. Press ENTER to go to the Channel Edit
submenu.
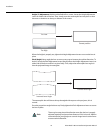
01 0,2 pDig vhd 720p
02 0,2 iDig 16x9 night
03 0,2 iDig 4x3 night
04 0,2 iDig ltrbox night
05 0,2 iDig iwide night
06 0,2 iDig cinema night
07 0,2 iDig iw235 night
08 0,2 pDig 16x9 night
09 0,2 pDig 4x3 night
<Enter> = Edit, <Func> = more options
location signal type channel name
Channel Setup