


Installation
Vidikron Vision 85 Owner’s Operating Manual 27
PRE
L
IMINAR
Y
3.5
Mounting the Vision 85
There are several methods for mounting the projector. Depending on your chosen
installation, one method may be more suitable than another.
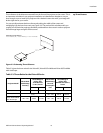
Floor Mounting (Upright)In typical front and rear screen installations, the projector can be mounted to a secure and
level surface such as a table or cart. Carts are useful when moving a projector during a
presentation or from site to site. If possible, lock the wheels when it’s in position to prevent it
from being moved during a presentation.
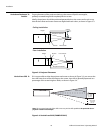
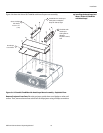
Ceiling Mounting (Inverted)For fixed installations, and for those that want the projector out of sight or have a limited
space for projector and audience, you can invert the Vision 85 and suspend it from the ceiling
using a specially-designed ceiling mount fixture.
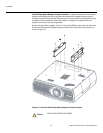
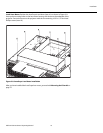
The projector can also be inverted and placed in an enclosure above and behind the viewing
area. Install four feet on the inside bottom surface of the enclosure on which the projector
can rest. A variety of materials can be used for this purpose (for example, rubber crutch tips
or turntable feet).
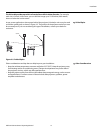
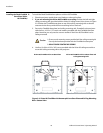
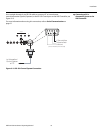
Adjusting the Projection
Angle
If the Vision 85 is ceiling-mounted and the screen is significantly lower than the projector,
you can tilt the projector at a slight angle by adjusting the ceiling mount.
If you do this, you may need to shift the image using the OSD controls, to compensate. For
detailed instructions, refer to
Using the On-Screen Menus on page 37.
Use only the Vidikron-approved ceiling mount kit (part number
VIHK-000190) designed for your projector. Install the mount kit according
to the instructions provided with it.
Note