


Mount Installation 5
MAN0572 (Rev. 1/30/2009)
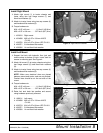
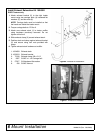
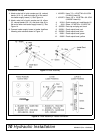
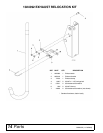
Install Right Mount
1. Attach right mount (1) to tractor chassis and
frame using four hex flange screws (7) and
Nord-Lock washers (9).
2. Attach to tractor frame using two cap screws (4)
and hardened flat washers (8).
3. Torque hardware to:
M14 x 2.0P x 40 mm . . . . . . . 111 lbs-ft (109 N-m)
M20 x 2.5P x 100 mm . . . . . 337 lbs-ft (457 (N-m)
1. 1023010 Right mount
4. 1024088 M20 x 2.5P x 100 mm HHCS
CL10.9
7. 1028750 M14 x 2.0P x 40 mm HFS CL10.9
8. 1006371 3/4 Hardened flat washer
9. 1026300 14 mm Nord-Lock washer
Figure 3. Right Mount Installed
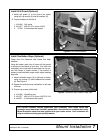
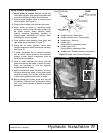
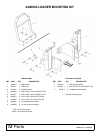
Install Left Mount
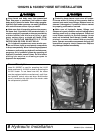
1. Support fuel tank with hydraulic floor jack and
remove strap on bottom of tank. Lower tank for
access to mounting pad. See Figure 4.
2. Attach left mount (2) to tractor chassis using four
hex flange screws (6) and Nord-Lock washers
(9).
3. Attach to tractor frame using two cap screws (4)
and hardened flat washers (8).
NOTE: Make sure electrical wires are placed
between mount and tractor, and are not pinched.
Coolant lines should be on the out side of the
mount.
4. Torque hardware to:
M14 x 2.0P x 40 mm . . . . . . . 111 lbs-ft (109 N-m)
M20 x 2.5P x 150 mm . . . . . 337 lbs-ft (457 (N-m)
5. Raise fuel tank back into position and secure
using hardware previously removed.
2. 1023011 Left mount
4. 1024088 M20 x 2.5P x 100 mm HHCS
CL10.9
6. 1028719 M14 x 2.0P x 60 mm HFS CL10.9
8. 1006371 3/4 Hardened flat washer
9. 1026300 14 mm Nord-Lock washer
Figure 4. Lower Fuel Tank
Figure 5. Left Mount Installed
4
8
7
9
DP1
DP2
4
8
6
9
DP3