


7
3M 1996
3M Multimedia Projector MP8030
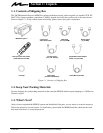
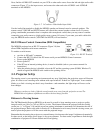
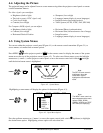
Next, find the AUDIO OUT terminals on your VCR or other audio source. Insert the left and right audio cable
connectors (Figure 3-7) to the input source, and connect the other end to the AUDIO-L and AUDIO-R
terminals on the MP8030.
Figure 3-7. 3-Conductor Video/Audio Input Cable
Use the Audio-Out terminal to disable the MP8030 speaker and channel sound to external speakers. The
remote control VOLUME and MUTE buttons will control the external speaker volume levels. If you are
giving a multimedia presentation that is complete with stereophonic sound, then you may want to consider
connecting your audio source to a high-quality stereo system. Of course, if you route your audio cables this
way, the MP8030 audio controls (VOLUME and MUTE) will not function.
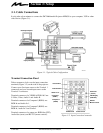
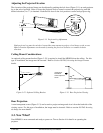
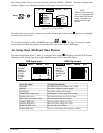
RS-232 Mouse Control Connection (IBM Compatibles)
The MP8030 projector has an RS-232 connector (Figure 3-8) that
allows IBM compatible serial mouse emulation.
To emulate a serial mouse:
a. oer don te M3 and C computer
b. Connect the RS-232 cable to the PC mouse serial port and MP8030 Control connector
c. Power up the MP8030
d. Power up the PC
e. If the PC has an internal pointing device, it must be disabled (refer to your owners manual for
instructions)
f. After the pointing device is disabled, reboot the PC and the operating system (DOS, Windows)
should recognize the MP8030 stick switch as the pointing device
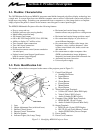
3-2. Projector SetUp
The meeting room is your operating environment and any stray light hitting the projection screen will become
glare. It is best to use a meeting room without wide-open windows. If there are “light stripes” from venetian
blinds, try to find a viewing area that’s away from them—and remember, the light stripes will move as the
hour changes.
Note
Whenever you have a choice, light the room from the rear, away from the projection screen. The
MP8030 has a brightness adjustment to achieve the best image possible.
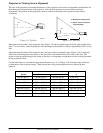
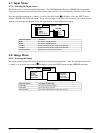
Distance to Viewing Screen
The 3MMultimedia Projector MP8030 can be used in a small or large meeting room to project a quality
image from 46 cm (18 in.) to 762 cm (300 in.) in size. The distance between the projector and the viewing
screen (see “a” in Figure 3-10) and the zoom lens setting (minimum to maximum) will determine the size of
the projected image. Refer to the table in Section 9-2 to determine how far away from the viewing screen you
need to place the projector to fill the screen with the projected image.
Remember that increasing the projector-to-screen distance also decreases the image’s brightness dramatically.
In other words, as the image grows larger, it also grows dimmer. For best results, experiment to find the right
combination of projector-to-screen distance and room lighting.
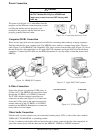
Figure 3-8. RS-232 Terminal
Projector
(9-pin)
Computer
(9-pin)