


Mio Modero R-3 Setup
6
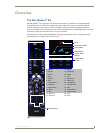
Mio Modero R-3 Remote
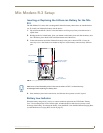
Installing Custom Buttons
1. Flip and turn the Mio R-3 device so that the buttons are facing away from you and the device is
upside down.
2. Holding the Mio R-3 in both hands, place your thumbs on the battery door and push up to slide the
battery door free. The battery door will slide in the direction of the bottom end of the device.
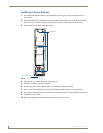
3. Unscrew the 6 screw points indicated in FIG. 3.
4. Turn the unit over so that the buttons are facing you.
5. Lift the top assembly away from the PCB.
6. If necessary, push out the standard buttons from the front of the top assembly.
7. Drop on your custom button pad and verify the alignment with the guide posts on the PCB.
8. Place the top assembly back down on the PCB and return the unit over, exposing the 6 screw points.
9. Tighten the 6 screw points.
10. Replace the battery door, and slide the door upwards to lock it in place.
FIG. 3 Internal Mio R-3 Components
6 Screw Points
Programming Jack