


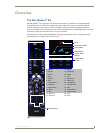
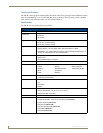


Mio Modero R-3 Setup
5
Mio Modero R-3 Remote
Mio Modero R-3 Setup
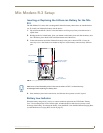
Inserting or Replacing the Lithium-ion Battery for the Mio
R-3
The Mio Modero R-3 comes with a rechargeable Lithium-Ion battery that needs to be installed before
use. To install your Lithium-Ion battery into the device:
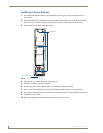
1. Flip and turn the Mio R-3 device so that the buttons are facing away from you and the device is
upside down.
2. Holding the device in both hands, place your thumbs on the battery door and slide the battery door
free. The battery door should slide toward the bottom end of the device.
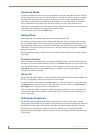
3. Connect the terminal end of the Lithium-Ion battery to the port as shown in FIG. 2. It may be
necessary to use a thin, blunt, non-conductive object to seat the battery connector fully within its
port.
4. Place the battery door back on the device, and slide the door upwards to lock it in place.
Battery Low Indicator
When the battery charge level is too low to sustain continuous operation, the LCD flashes "Battery
Low". If not recharged, the LCD will flash again, and then the device shuts down to prevent a total
discharge of the battery. To recharge the battery, insert the Mio R-3 into the Mio Remote Charging Base
(see the Mio Remote Charging Base section on page 27).
FIG. 2 Rechargeable Battery Port on The Mio Remote
Lithium-Ion Battery
Rechargeable
Battery
Port Connection
Correct path for battery
wires and connector
Rear view -
Battery Compartment
Make sure to inset the battery wires in the case as shown in FIG. 2, or the wires may
be damaged when replacing the battery door.