


13
Positioning your projector
Safety instructions for ceiling mounting of the projector
We want you to have a pleasant experience using your BenQ projector, so we need to bring this safety matter to
your attention to prevent damage to person and property.
If you intend to mount your projector on the ceiling, we strongly recommend that you use a proper fitting
BenQ projector ceiling mount kit and that you ensure it is securely and safely installed.
If you use a non-BenQ brand projector ceiling mount kit, there is a safety risk that the projector may fall from
the ceiling due to an improper attachment through the use of the wrong gauge or length screws.
You can purchase a BenQ projector ceiling mount kit from the place you purchased your BenQ projector. BenQ
recommends that you also purchase a separate Kensington lock compatible security cable and attach it securely
to both the Kensington lock slot on the projector and the base of the ceiling mount bracket. This will perform
the secondary role of restraining the projector should its attachment to the mounting bracket become loose.
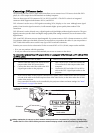
Obtaining a preferred projected image size
The distance from the projector lens to the screen, the zoom setting, and the video format each factors in the
projected image size.
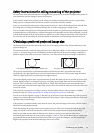
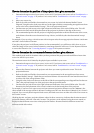
The maximum (native) resolution of the projector is 854 x 480 pixels, which is a 16 to 9 aspect ratio (expressed
as 16:9). A 4:3 aspect image source will display in the horizontal center of the projected image, resulting in a
pillarbox display (with unlit vertical areas—black bars—on either side of the projected image) as illustrated.
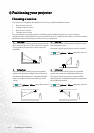
The projector should always be placed horizontally level (like flat on a table), and positioned directly
perpendicular (90° right-angle square) to the horizontal centre of the screen. This prevents image distortion
caused by angled projections (or projecting onto angled surfaces).
The modern digital projector does not project directly forward (like older style reel-to-reel film projectors did).
Instead, digital projectors are designed to project at a slightly upward angle above the horizontal plane of the
projector. This is so that they can be readily placed on a table and will project forward and upwards onto a
screen positioned so that the bottom edge of the screen is above the level of the table (and everyone in the room
can see the screen).
If the projector is mounted on a ceiling, it must be mounted upside-down so that it projects at a slightly
downward angle. See "Safety instructions for ceiling mounting of the projector" for details.
You can see from the diagram on page 15, that this type of projection causes the bottom edge of the projected
image to be vertically offset from the horizontal plane of the projector. When ceiling mounted, this refers to the
top edge of the projected image.
If the projector is positioned further away from the screen, the projected image size increases, and the vertical
offset also increases proportionately.
When determining the position of the screen and projector, you will need to account for both the projected
image size and the vertical offset dimension, which are directly proportional to the projection distance.
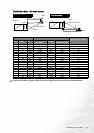
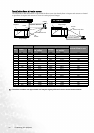
BenQ has provided separate tables of dimensions for both 16:9 and 4:3 screen ratios to assist you in
determining the ideal location for your projector on pages 15 and 16. There are two dimensions to consider, the
perpendicular horizontal distance from the centre of the screen (projection distance), and the vertical offset
height of the projector from the horizontal edge of the screen (offset).
16:9 aspect image in a 16:9 aspect display area 4:3 aspect image in a 16:9 aspect display area