


27
4. Operation
4.1 Power on
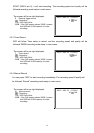
Before turning power on make sure the HDD has been locked, and the POWER LED is red
color now. After pressing POWER button, POWER LED will turn to orange color, then all
other LED light will turn to RED color except the LED for HDD. OSD screen will display
“HDD Detecting”, Power on period will be running approximately 5 to 15 seconds. If HDD is
set as Master, and screen will display as “HDD Master Connect”. If HDD is set as Slave,
and screen will display as “HDD Slave Connect”. In order to shorten the power on running
time, we suggest set the HDD as Master. After set DVR power on, POWER LED will turn to
green color. (You can set up HDD to be Master or Slave by jumper setting on HDD.)
4.2 Recording
Your DVR offers a variety of flexible recording modes. You can set it up to record all the
time, scheduling time, or to only record events, and you can also set up record speed and
resolution. You can set those options by selecting MENU and System before recording.
Under the recording status, if power is stopped accidentally, recorded video will still store in
the HDD after power on. DVR will continue original recording setup after power turning on
again.
There are 4 record modes for DVR: Alarm Record, External Trigger Record, Scheduling
Timer Record, and Manual Record. All record Modes descriptions in followings.
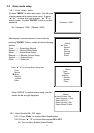
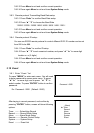
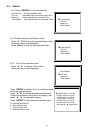
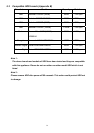
4.2.1 Alarm Record
When DVR be triggered by alarm input, it will start to record immediately. The recording
speed & quality will be followed alarm recording mode setup in main menu.
The screen will be as right displayed.
A : Alarm trigger
: Recording
OW : HDD Over Write
32GB : If the OW location shows 32GB, it means
that HDD left 32 GB capacity for video
recording.
2002 – JAN –01 01:02:03
A
OW
4.2.2 External Trigger Record
DVR can be programmed to record by external device. When external trigger REC