


1717
CONNECTIONS
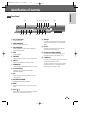
Connections
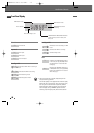
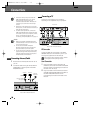
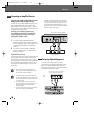
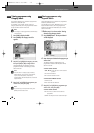
S-Video Connection
1
Connect the S-VIDEO OUT jack on the DVB-T
HDD/DVD Recorder to the S-Video in jack on
your TV using an S-Video cable (S).
2
Connect the Left and Right AUDIO OUT jacks
from the DVB-T HDD/DVD Recorder to the
left/right audio in jacks on your TV using the
audio cables.
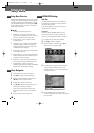
Component Video Connection
• If your television is a high-definition or ‘digital
ready‘ television, you may take advantage of
the DVB-T HDD/DVD Recorder’s Progressive
Scan output for the highest video resolution
possible.
• If your TV does not accept the Progressive Scan
format, the picture will appear scrambled.
1
Connect the COMPONENT VIDEO OUT jacks on
the DVB-T HDD/DVD Recorder to the
corresponding jacks on your TV using a Y Pb Pr
cable (C) if the component (Y, Pb, Pr) is available
on your TV.
2
Connect the Left and Right AUDIO OUT jacks of
the DVB-T HDD/DVD Recorder to the left/right
audio jacks on your TV using the audio cables.
• Be sure to set the DVB-T HDD/DVD Recorder to
Progressive Scan mode by pressing [P.SCAN].
(or changing the ‘Video Output’ in the Setup
Menu; see page 30).
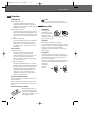
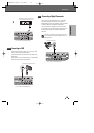
HDMI connection
If you have a HDMI TV or monitor, you can connect
it to this recorder using a HDMI cable.
1
Connect the HDMI jack on the recorder to the
HDMI jack on a HDMI compatible TV or monitor
(H).
2
Set the TV’s source to HDMI (refer to TV’s
Owner’s manual).
receiver via one of this recorder’s digital audio
outputs.
• No sound will be output from the HDMI cable if the
Digital out option is not set to ‘PCM’ on the Setup
menu (See page 31).
• The arrow on the cable connector body should face
up for correct alignment with the connector on the
recorder.
• If there is noise or lines on the screen, please check
the HDMI cable.
• When you use HDMI connection, you can change
the resolution (576i, 576p) for the HDMI output by
setting the video output option in the setup menu.
- RGB, Interlace mode : 576i
- Progressive mode : 576p
• Changing the Progressive Scan mode when the
recorder is connected with HDMI connector may
result in malfunctions. To solve the problem, turn
off the recorder and then turn it on again.
About HDMI
HDMI (High Definition Multimedia Interface) supports
both video and audio on a single digital connection for
use with DVD Players, Set-Top Boxes, and other AV
devices. HDMI was developed to provide the
technologies of HDCP (High Definition Contents
Protection). HDCP is used to protect digital content
transmitted and received.
HDMI has the capability to support standard, enhanced,
or high-definition video plus standard to multi-channel
surround-sound audio, HDMI features include
uncompressed digital video, a bandwidth of up to 5
gigabytes per second, one connector (instead of several
cables and connectors), and communication between the
AV source and AV devices such as DTVs.
HDMI, the HDMI logo and High-Definition Multimedia
Interface are trademarks or registered trademarks of
HDMI licensing LLC.
Additional Information for HDMI
When you connect a HDMI or DVI compatible device
make sure of the followings:
- Try switching off the HDMI/DVI device and this
recorder. Next, switch on the HDMI/DVI device and
leave it for around 30 seconds, then switch on this
recorder.
- The connected device’s video input is set correctly for
this unit.
- The connected device is compatible with
720(1440)x576i or 720x576 progressive video input.
Not all HDCP-compatible DVI devices will work with this
recorder.
- It’s impossible to copy a copy protected DVD title in
non-HDCP device.
• When you use the HDMI connection, the
audio’s sampling frequency is outputted only
with 48KHz even if you select [96KHz].
• This recorder does not perform internal (2
channel) decoding of a DTS sound track. To
enjoy DTS multi channel surround, you must
connect this recorder to a DTS compatible
0202DRHT-630 2007.2.2 9:19 AM ˘ `17