


30
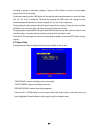
6.4 Alarm Recording
Alarm recording is not started by manually pressing the Record button, it is automatically
activated once Schedule mode is enabled. Alarm recording can be activated by alarm input signal
or motion, if the connection of alarm input equipment is correct, stable and reliable, and the alarm
settings are correct. For recording to be activated by exterior input signal or motion detection the
system must be set to Schedule Mode active and that period is set to “A” in Record Schedule
setup. You must also set the menu of Alarm Setup for exterior input alarm, and the alarm enable
setting of that channel must be set to “ON”. For Motion Alarm, the motion enable setting of that
channel must set “ON”, and set the area for motion detection must be set. If Schedule mode is
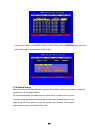
disabled the system will not start recording on alarm. Setting schedule on or off is achieved
through pressing the SCHEDULE button on the front panel or remote, but not through the System
Setup menu and window. When the unit is in Schedule Mode active, the character “S” will display
on the screen. Alarm video recording can’t be stopped by pressing the RECORD or STOP button
while Schedule Mode is active. To ensure that once Schedule Mode is set to on that the schedule
cannot be accidentally stopped there is a password protection to stop Schedule Mode. You must
press the SCHEDULE button then enter the correct password to turn Schedule Mode off. Check
Alarm Recording setup before recording; confirm the video quality and the frame rate, as the
record setting can’t be changed during the recording process. As long as the alarm input signal is
correctly set the alarm recording will continue during the period of time set up by A/M REC TIME,
and when the outside the time period the alarm recording automatically stops.
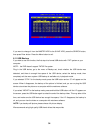
6.5 Time Recording
Time recording starts and stops recording automatically according to the pre-arranged time period.
It is applied to a fixed timetable, for example business hours time recording (or outside business
hours time recording) with fixed start/stop time. To start the Time Recording function you must
have a record schedule setup beforehand. When this is done, press the SCHEDULE button on
the front panel to set schedule mode to on and the schedule symbol “S” will display on the screen.
The Time Recording mode will not work unless you activate Schedule Mode. To make Time
Recording mode active the system must be set to Schedule Mode active and that period is set to
“T” in Record Schedule setup. In Time Record mode, you must press the SCHEDULE button then
enter the password to stop time recording. Because Time recording is reliant on the system being
set with the correct time, you must adjust the time to your correct local time before using this
function.
6.6 Playback
Press the PLAY button and the system will begin to play the images recorded from the start of the
most current recording.
If the recording is playing, press the PAUSE button to pause playing, press the PLAY button again
to resume normal play.
To use Fast Forward playing or Fast Backward playing, press the FWD or REW button while the