


QSTD2400 Series DVR User’s Manual
31
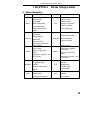
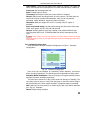
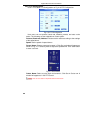
Video quality: There are five options from lowest to highest. The higher the
value is, the clearer the recorded picture is, but the more hard drive is taken up.
Frame rate: Set recording frame rate.
Audio: Enable audio to record.
Time stamp: Record the current time on the video file if checked.
Record: Switch on/off recording function for every camera. The video from the
camera will only be recorded if checked here, then you can use manual,
scheduled, motion detection, and sensor alarm recording.
Resolution: DVR can support CIF and D1. Currently only CIF option is
available.
Alarm record hold time(s): set the post recording time after alarm event ends.
There are 4 options, 30, 60, 120, and 180 seconds.
Recycle: enable hard drive recycling. If boxed is not checked DVR will stop
recording when HDD is full, if checked oldest files will be overwritten by new
ones.
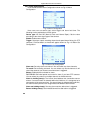
Notice: Video quality, frame rate and resolution are closely related to hard drive storage
space. The higher the values are, the higher the bit rate and the more storage space that is taken
up by the files.
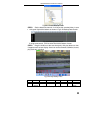
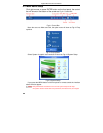
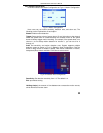
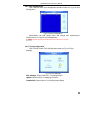
4.2.4 Schedule Configuration
Click SCHEDULE to enter Schedule Configuration as Fig 4.8 Schedule
Configuration.
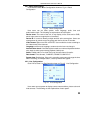
Fig 4.8 Schedule Configuration
Here users can set schedule for scheduled, motion detection, and sensor
alarm recording respectively. The following are the explanations of each option.
Schedule, Motion and Sensor: refer to recording on a regular schedule, motion
schedule and alarm schedule respectively.
The left column shows the 7 days of the week from Sunday to Saturday. The
row refers to the 24 hours in a day. Click the boxes or use the mouse to drag to
set the schedule time. Green means checked. Transparent means unchecked.
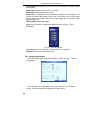
Add: Users can set a schedule for a certain day by date. Click Add to add date
as in Fig 3.9 Calendar.
Delete: Delete holiday schedule.