


10
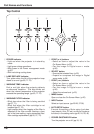
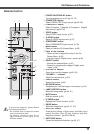
Top Control
② LAMP REPLACE indicator
Turn yellow when the life of the projection lamp
draws to an end. (pp.60, 71-72)
④ WARNING FILTER indicator
– Blink slow when the filter is being scrolled
(pp.57, 71).
–
Blink fast when the filter cartridge is not
installed (pp.57, 72)
– Light orange when the clogging of the filter is
detected or the filter counter reaches a time
set in the timer setting, urging immediate filter/
filter cartridge replacement (pp.55, 57, 72).
⑪ POWER ON/STAND-BY button
Turn the projector on or off. (pp.18, 19)
① POWER indicator
– Light red when the projector is in stand-by
mode.
–
Light green during operations.
– Blink green in the Power management mode
(p.50).
–
Blink red during cooling down.
⑧ MENU button
Open or close the On-Screen Menu. (p.20)
⑤ POINT (▲▼) buttons
– Select an item or adjust the value in the
On-Screen Menu. (p.20)
–
Pan the image in Digital zoom + mode.
(p.36)
⑥ SELECT button
– Execute the selected item. (p.20)
– Expand or compress the image in Digital
zoom mode. (p.36)
Part Names and FunctionsPart Names and Functions
⑦ POINT (◄►) buttons
– Select an item or adjust the value in the
On-Screen Menu. (p.20)
–
Pan the image in Digital zoom + mode.
(p.36)
– Adjust the volume level. (p.23)
⑩AUTO SETUP button
Execute the setting of Auto setup (includes
Input search, Auto PC adj. and Auto Keystone
functions) in the setting menu.(pp.22, 24, 28, 46)
① ② ③ ④
⑥⑦⑧⑨⑩
⑪
⑤
③ WARNING TEMP. indicator
Emit a red light when the projector detects
an abnormal condition. This also blinks red
when the internal temperature of the projector
exceeds the operating range. (pp.63, 71-72)
⑨ INPUT button
Select an input source. (pp.25-26, 37-38)