


Replacing or Adding a Disk Module
3-9
Servicing a DAE2
Replacing or Adding a Disk Module
CAUTION
!
Disk modules are extremely sensitive electronic components.
Always handle a disk module gently, and observe the following
guidelines:
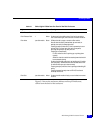
◆ Always replace a disk drive with another of the same model; do
not mix Fibre Channel and ATA components in the same
enclosure. Refer to Figure 1-7 on page 1-8 for a visual
comparison of FC and ATA disk carriers.
◆ Follow the instructions in the preceding section Avoiding
Electrostatic Discharge (ESD) Damage on page 3-6.
◆ Always wear a properly-attached ESD wristband when
removing or replacing a disk module.
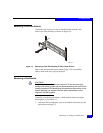
◆ When removing a disk module, pull the module part way out of
the slot, then wait 30 seconds for the drive to spin down before
removing it.
◆ Place modules on a soft, antistatic surface, such as an
industry-standard antistatic foam pad or the container used to
ship the module. Never place a disk module directly on a hard
surface.
◆ Never hit modules, stack modules, or allow them to tip over or
fall.
◆ Avoid touching any exposed electronic components and circuits
on the disk module.
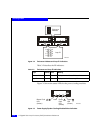
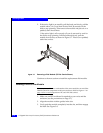
◆ Do not remove a faulty disk module until you have a
replacement module (with the same part number) or a filler
module available. The part number (PN005xxxxxx) appears on
the top or bottom of the module. A replacement or add-on disk
module should have the same format (bytes per sector) and the
same capacity (size and speed) as the other modules in the
enclosure.
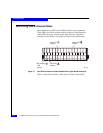
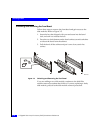
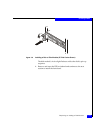
You must remove the disk enclosure’s front bezel to gain access to the
disk modules. The bezel is required for EMI compliance when the
enclosure is powered up. Remove it only to replace or add a disk
module.