2-15DVS 406 • Installation and Operation
Advanced Configuration
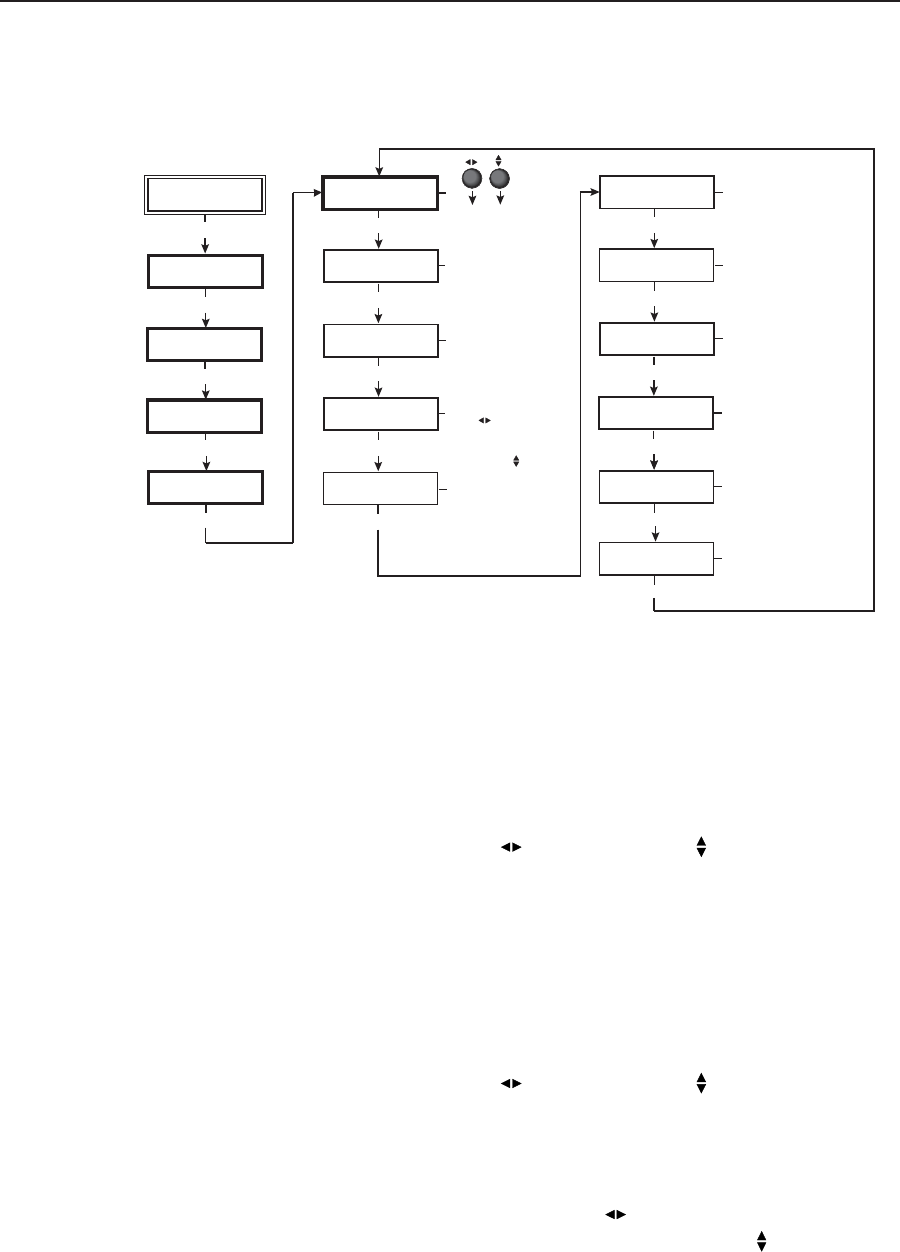
The following flowchart provides an overview of the Advanced Configuration
submenus and the options for each setting.
Extron
DVS 406
Output
Configuration
MENU
Input
Configuration
MENU
Audio
Configuration
MENU
Memory
Presets
MENU
Switch Mode
<Take> Auto
NEXT
Advanced
Configuration
MENU
Effect Type
Cut
NEXT
Edge Smoothing
Off <On>
NEXT
Top Blanking Bot
000 000
NEXT
RGB Delay
0.0 Seconds
NEXT
Blue Mode
<Off> On
NEXT
Key Mode
<Off> On
NEXT
2:2 Pull Down
NEXT
NEXT
Either Adjust knob is used
to adjust the submenus.*
To reset the scaler, press
Take button, then press
again to confirm
*Adjust knobs do not affect
this submenu.
RGB to video input
switching effect
• Cut (default)
• Dissolve: ranges from 0.2
to 1.0 seconds in 0.1 sec
increments
Smooth edges
• On (default)
• Off
Top and bottom blanking
• Top blanking: ranges from
000 (default) to 127.
Use
• Bottom (Bot) blanking:
ranges from 000 (default)
to 127. Use
RGB delay time
(in seconds)
• 0.0 (default) to 5.0
seconds in 0.5 second
increments
Switch mode switches to
next input:
• when Take button is
pressed (default)
• automatically (Auto) when
input button is pressed
Display blue and sync only
• On
• Off (default)
Set input switching to key
mode
• On
• Off (default)
Enhanced Mode
<Off> On
NEXT
Off <On>
Press and Hold
TAKE to Reset
NEXT
Enhanced mode
(gain control)
• On
• Off (default)
PAL film mode
(2:2 pull down detection)
• On
• Off (default)
Effect type
From this submenu, the RGB to video input switching effect is selected. The two
effects are cut and dissolve. A cut instantaneously switches from one input to
another. A dissolve causes one input to fade out while fading in another selected
input. The dissolve effect duration is adjustable. For these effects to occur, the
initial input must be on input 1 with the output resolution locked to input 1
(“Resol Lock to #1”). See the “Output Configuration” section in this chapter for
instructions on locking the resolution.
Using either the horizontal Adjust (
) or vertical Adjust ( ) knob, select either
cut or dissolve. The default is cut. The dissolve effect has a switch transition
period which is adjustable from 0.2 seconds to 1.0 seconds in 0.1 second
increments. Attempting to adjust the period below 0.2 seconds will return to the
cut effect. Pressing the Take button after selecting a second input will initiate the
switching effect between input 1 and the selected input.
Edge smoothing
This submenu features edge smoothing. Edge smoothing smooths edges of a
picture by minimizing the differences between pixels.
Using either the horizontal Adjust (
) or vertical Adjust ( ) knob, select either
“On” or “Off”. The default is “On”.
Top and bottom blanking (blanking adjustment)
To remove noise or extraneous material such as closed captioning by removing
scan lines at either the top or bottom of the screen, adjust the top blanking or
bottom blanking. Rotate the horizontal Adjust ( ) knob to set the number of
lines removed from top of the picture. Rotate the vertical Adjust (
) knob to set
the number of lines removed from the bottom.
Both the top and bottom blanking adjustments range from 0 to 127, with the
default setting being set to 0 for either adjustment.


