


10
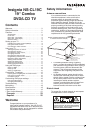
Insignia NS-CL19C 19" Combo DVD/LCD TV
www.insignia-products.com
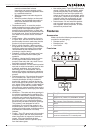
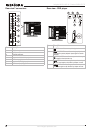
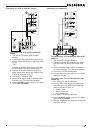
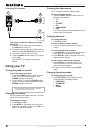
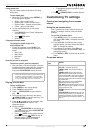
Connecting to a computer
To connect a computer video source to the
VGA jacks:
1 Connect a VGA cable from the computer to
the VGA IN port on the TV.
2 Connect a male-to-male audio cable from the
computer to the PC AUDIO IN port on the TV.
3 Turn on the TV, then turn on the PC.
4 Press the INPUT button to set the TV’s signal
input to PC.
See “ADJUST” on page 16 to adjust the
picture.
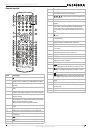
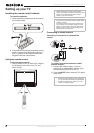
Using your TV
Turning the power on and off
To turn the power on and off:
1 Press the POWER button on the front panel
of the TV or on the remote control. The
POWER indicator turns green.
2 To turn off the TV, press the POWER button
again. The screen image disappears and the
POWER indicator turns red.
Changing the volume
You can change the volume using the TV’s front
panel or the remote control.
To change the volume:
1 Press VOL+ or VOL- .
2 Press MUTE on the remote control to mute
the sound, and press it again (or the VOL+ or
VOL- ) to restore the sound.
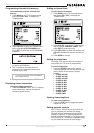
Changing the video source
Your TV supports multiple video sources.
To select the video source:
• Press the INPUT button to select from the
following input modes:
•TV
•AV
•S-VIDEO
•PC
• COMPONENT
•DVD
The name of the input source appears on the
screen when it is selected.
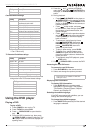
Changing channels
To change channels:
• Press CH+ or CH-.
To enter a channel number directly:
• Press the number buttons on the remote
control.
To switch between two channels:
1 Press RECALL to change from the currently
tuned channel to the previous channel.
2 Press RECALL again to change back to the
originally tuned channel.
To scan through memorized channels:
1 Press SCAN on the remote control. The
picture pauses for about two seconds on
each memorized channel.
2 To stop the Scan function, press SCAN
again.
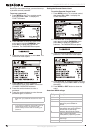
Changing the picture mode
To change the picture mode:
• Press PICTURE on the remote control to
cycle through the following modes:
• PERSONAL
• STANDARD
•MILD
•FRESH
Note
A small amount of electric power is consumed
even when the power is turned off.
1
2
3