


11
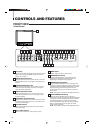
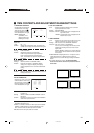
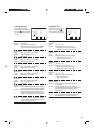
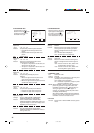
1. APERTURE CONTROL
Compensates the frequency
characteristics of the input
video signal. Press the
button to display the setting
menu illustrated on the right.
NOTE :APERTURE
CONTROL is not
displayed when the
RGB signal is input.
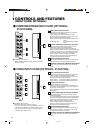
● INPUT A/B corresponds to SLOT 1, INPUT C/D to SLOT 2,
and INPUT E/F to SLOT 3.
● VIDEO-1 or VIDEO-2 shows the video input card is installed.
COMPO. or RGB shows the component/RGB input card.
SDI 1 or SDI 2 shows the SDI input card is installed.
● NO SLOT shows no input cards are installed.
Item : LEVEL
Adjustment
range : 00 ~ +10
Function : Adjusts the compensate value. The higher the
number is, the larger the compensate value gets.
Item : CONTROL FREQ.
Settings : HIGH/LOW/OFF
Function : Adjusts the frequency compensation.
HIGH : Compensates the high frequencies.
LOW :Compensates the low frequencies.
OFF : Deactivates the aperture compensation.
Item : sub menu
Adjustment range/
Settings : Same as LEVEL or CONTROL FREQ.
Function : Performs the LEVEL or CONTROL FREQ.
settings in a single-line display. The display
position depends on the “sub menu POSITION”
setting.
Item : reset
Function : Sets the LEVEL and CONTROL FREQ. values to
factory-preset ones.
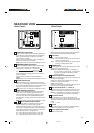
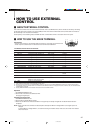
2. SLOT CONDITION
Displays the status of the input
cards installed in each of the
input card slots. Press the
button to display the setting
menu illustrated on the right.
<SLOT CONDITION>
INPUT A : VIDEO-1
INPUT B : VIDEO-2
INPUT C : COMPO.
INPUT D : RGB
INPUT E : NO SLOT
INPUT F : NO SLOT
EXIT:
MENU
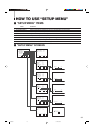
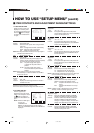
Ⅵ ITEM CONTENTS AND ADJUSTMENT RANGE/SETTINGS
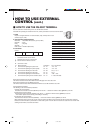
16:9
4:3
14:9 13:9
<APERTURE CONTROL>
LEVEL :00
CONTROL FREQ. :HIGH
sub menu
reset
EXIT: MENU ADJUST:- + SELECT:
Items : INPUT A:/INPUT B:/INPUT C:/INPUT D:/INPUT
E:/INPUT F:
Settings : VIDEO-1/VIDEO-2/COMPO./RGB/SDI 1/SDI 2/
NO SLOT
Function : Displays the status of the input cards installed in
each of the input card slots.
3. sub menu POSITION
Items : Selects the display position of the sub menu
superimposed on the screen.
Settings : UPPER/LOWER
Functions : UPPER : An adjustment item is displayed on the
top of the screen.
LOWER : An adjustment item is displayed on the
bottom of the screen.
4. AREA MARKER
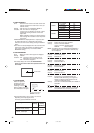
Items : Selects the size marker for the other screen ratio
(aspect) used when the screen ratio is 16:9.
Settings : OFF/4:3/16:9/14:9/13:9/MODE 1/MODE 2
Functions : OFF: The marker is not displayed.
4:3/16:9/14:9/13:9: Displays the marker (a white
quadrangle) showing the screen size of each
aspect ratio.
MODE 1/MODE 2: Displays no markers because
these settings will be used for function expansion
in the future.
● AREA MARKER is displayed when a 16:9 picture such as
1080i/1035i/720p etc. is displayed or the picture is
switched to the 16:9 screen ratio by pressing the ASPECT
button.
● To actually display the marker, the AREA MARKER
button on the monitor needs to be pressed so that it is
illuminated.
Untitled-1 01.3.27, 9:5811