


35
7-7 Series Recording
The series recording function facilitates recording over much longer periods using several connected SR-9168Us.
As soon as the tape ends in one VCR, the next VCR in the series starts recording.
7 RECORDING
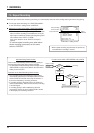
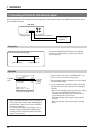
5 Connect the first VCR’s [SERIES/CLOCK OUT] terminal
to the second VCR’s [SERIES/CLOCK IN] terminal.
Connect the second VCR’s [SERIES/CLOCK OUT]
terminal to the third VCR’s [SERIES/CLOCK IN]
terminal. Repeat for all connected VCRs. Connect the
VCR’s [COM] terminals as well.
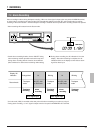
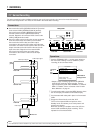
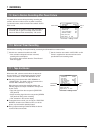
5 Connect a video camera and/or other source equipment
to the first VCR’s video and audio input connectors.
Connect the first VCR’s video and audio output
connectors to the second VCR’s video and audio input
connectors. Connect the second VCR’s video and audio
output connectors to the third VCR’s video and audio
input connectors. Repeat for all connected VCRs.
Connect the last VCR’s video and audio output
connectors to the monitor’s video and audio input
connectors.
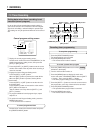
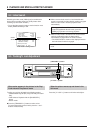
Connections
First VCR Second VCR Third VCR
Rear panel
COM
SERIES/CLOCK
IN OUT
COM
SERIES/CLOCK
IN OUT
COM
SERIES/CLOCK
IN OUT
Operations
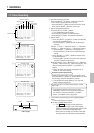
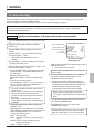
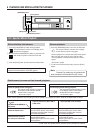
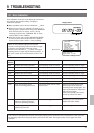
1 Set the <TERMINAL SEL 1> function menu switch on
the VTR mode 2 setting screen to “SERIES” (series
recording) for all connected VCRs.
TERMINAL
SEL 1
REC
REMAIN
Set to
SERIES
VCR mode-2
setting screen
VTR MODE 2
(SUMMER TIME) OFF
(TERMINAL SEL 1) SERIES
(TERMINAL SEL 2) WARN
(REC REMAIN)) OFF
(COUNT END) OFF
PRESS (SHIFT, SET)
PRESS (MENU) TO END
Rear
panel
Video input signal
First VCR
Second VCR
Last VCR
Video output
Audio output
Monitor TV
Audio input signal
OUT
IN
OUT
IN
OUT
IN
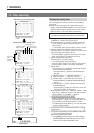
• Output a series recording signal from the [SERIES/
CLOCK OUT] terminal to start recording. Set the
signal output timing with <REC REMAIN> or <COUNT
END>. For details, refer to "Contents of the Function
Menu Switches" on page 21.
2 To end function setting, press the MENU button to close
the menu display and restore the time/date display.
3 Load cassettes with safety tab in place in all connected
VCRs.
4 Engage the Record mode on the first VCR.
Turn on all connected VCRs and put them in the
Standby mode. This allows you to check picture and
sound on the monitor.
When the recording is complete on the first VCR, the
second VCR automatically starts recording. This is
repeated for all connected VCRs.
Note
• If a cassette has not been loaded in any VCR in the series, series recording will stop when that VCR is reached.