


25 960-Hour Time Lapse Video Cassette Recorder 960-Hour Time Lapse Video Cassette Recorder 14
✔
• If the Repeat Rec Set
is set to “NO” in the
REC MODE SET
menu, recording will
continue to the end of
the tape, then stop
and the tape will be
ejected.
✔
• A tape recorded on
this VCR cannot be
played back on
another make of time
lapse VCR.
• If you press the REC
button and the loaded
cassette has no
erasure-prevention
tab, the VCR will eject
the cassette.
• During recording, the
Menu button will not
function (the menu
cannot be accessed).
✔
• If you playback the
recorded part where
recording check was
performed, noise may
appear.
• If you change the
recording speed dur-
ing recording, noise or
a missing signal may
result.
✔
• During pause, the
image appears on
screen but it is not
recorded.
• If a recording pause
continues for 5 min-
utes or more, the VCR
will go into stop mode
to avoid damage to
the tape.
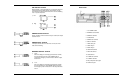
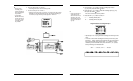
Normal Recording
Normal Recording
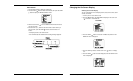
1 Turn the power on to all devices used.
2 Load a cassette tape with erasure prevention tab in place.
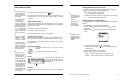
3 Press the REC/PLAY SPEED (or ) button to set the recording
speed.
• The recording speed is displayed on-screen and on the display panel.
• If you don’t want to record the recording speed, counter, title, time,
date etc, press the DISPLAY button, then start recording.
4 Press the REC button.
• The “REC” indicator is displayed on the display panel and recording
starts
.
5 To stop recording, press the STOP button.
<Recording Speed>
✔
• A slow motion effect
or accelerated play-
back effect can be
achieved by using a
slower or faster play-
back speed than the
speed used for
recording.
✔
• Noise will appear in
the image when
audio playback is
used in 12/24- hour
mode.
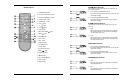
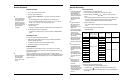
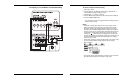
Normal Playback
Normal Playback
1 Turn on the power to the TV monitor.
2 Load the video cassette tape.
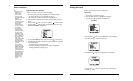
3 Press the REC/PLAY SPEED (or ) button to select the playback
speed.
• The selected playback speed is displayed on the display panel.
• A tape recorded with SP heads can be played in 2 / 12 / 24 / 36 / 48 /
72 / 96 / 120 / 168 / 240 / 360 / 480 / 720 / 960 / Hour.
4 Press the PLAY button.
• Playback starts.
• If necessary, adjust the tracking to eliminate the noise from the picture.
5 To stop playback, press the STOP button.
• To advanced or rewind the tape, press the FF/CUE or REW/REVIEW
button.
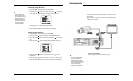
Tracking Control
If there is noise in the image during playback,
1 While looking at the playback picture, press and hold the TRACKING +
button to minimize the noise.
2 If it cannot be minimized, press the TRACKING - button.
3 Press the play button in the playback mode.
Audio Playback
Audio playback is only possible in 2-hour, 12-hour and 24- hour modes.
The playback speed has to be the same as the recording speed, for normal
playback of the audio.
For a tape recorded in 2-hour, 12-hour, and 24-hour modes, press the
AUDIO ON button after pressing the PLAY button. “A” will be displayed to the
left of the playback speed on the display panel. Press the AUDIO ON button
again to remove “A”.
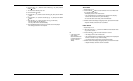
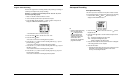
Record Pause
Recording can be interrupted temporarily.
1 Press the PAUSE/STILL button during recording.
• The “REC” and
“ ”
indicators are displayed on the display panel.
2 To resume recording, press the REC button, or press the PAUSE/STILL
button again.
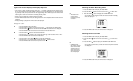
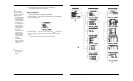
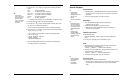
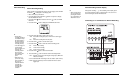
Recording
Speeds
2
12
24
36
48
72
96
120
168
240
360
480
720
960
Maximum recording
duration (with an
T-120 cassette tape)
Standard mode
Time Lapse mode
Recording
interval
1/60 second
0.12
0.22
0.32
0.42
0.62
0.82
1.02
1.42
2.02
3.02
4.02
6.02
8.02
Audio
Recording
Possible
Not possible
Tape Motion
Continuous
Intermittent