


44
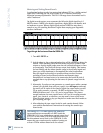
SDR 24/96
SDR 24/96
Undo, Redo, and Delete Last
♦
The history list contains all edit operations and recording passes in
chronological order.
♦
The undo command moves up one entry on the history list; the redo
command moves down one entry.
♦
Performing an edit operation or record pass permanently removes the
undone actions from the history list.
♦
When a recording pass is to be undone, you are asked whether or not
to keep the audio.
♦
The DELETE LAST button removes the last record pass and
automatically deletes the recorded audio, but only if this record pass is
the most recent entry in the history list.
♦
Depending on the size of the edits, up to 99 undo levels can be supported.
♦
Opening another project or turning off the SDR24/96 purges the
history list.
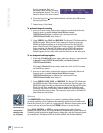
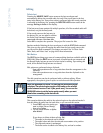
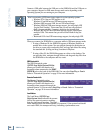
< SETUP MENU
Disk System
SETUP MENU >
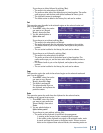
Record I/O Sync Transp
DISK UTILITY MENU
Mount Format Defrag
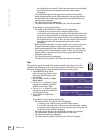
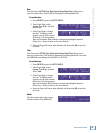
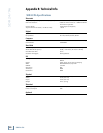
SETUP
SELECT DRIVE: External
<< >> Next
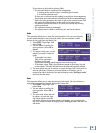
Format external drive.
Proceed? OK Cancel
Disk and System Utilities
There are several options available for managing the internal and external hard
drives, transferring files to a computer, and setting the date and time.
Disk Menu
The Disk Utility menu (under SETUP) allows you to mount, format, and
defragment a drive.
Mount Drive
Select Mount (SETUP:Page
Right:Disk:Mount) anytime you change
drives in the Mackie Media Bay. The
SDR24/96 takes a look at the internal
and external drives and checks to see if
the media has changed. When the
operation is complete, “Disk mount
complete” appears in the display.
Format Drive
The Format utility (SETUP:Page Right:Disk:Format) completely erases the data
on the hard drive and creates a new FAT32 partition, which fills the entire drive
space. All media must be formatted before it can be used with the SDR24/96.
Mackie Media M•90 drives come pre-formatted and ready to use, as do ORB disks
for the Mackie Media PROJECT drive (be sure to buy IBM formatted ORB disks).
To format a drive:
1. Press SETUP to enter the SETUP MENU.
2. Press Page Right, select Disk, and then select Format.
3. If there are multiple drives, the
Select Drive menu asks you to
select the drive to format. Select
either Internal or External using
the << / >> buttons. The selection defaults to the drive containing the
currently open Project. Select Next.
4. You are asked to confirm the
format command. Select OK to
proceed or Cancel to exit.
5. While the drive is formatting, the display indicates the progress of the
operation in percentages.