PRECAUTIONS
PREPARATION
ADVANCED PLAYBACK
BASIC OPERATIONS RECORDING OPTIONAL SETTINGS TROUBLESHOOTING INFORMATION
9
PREPARATION
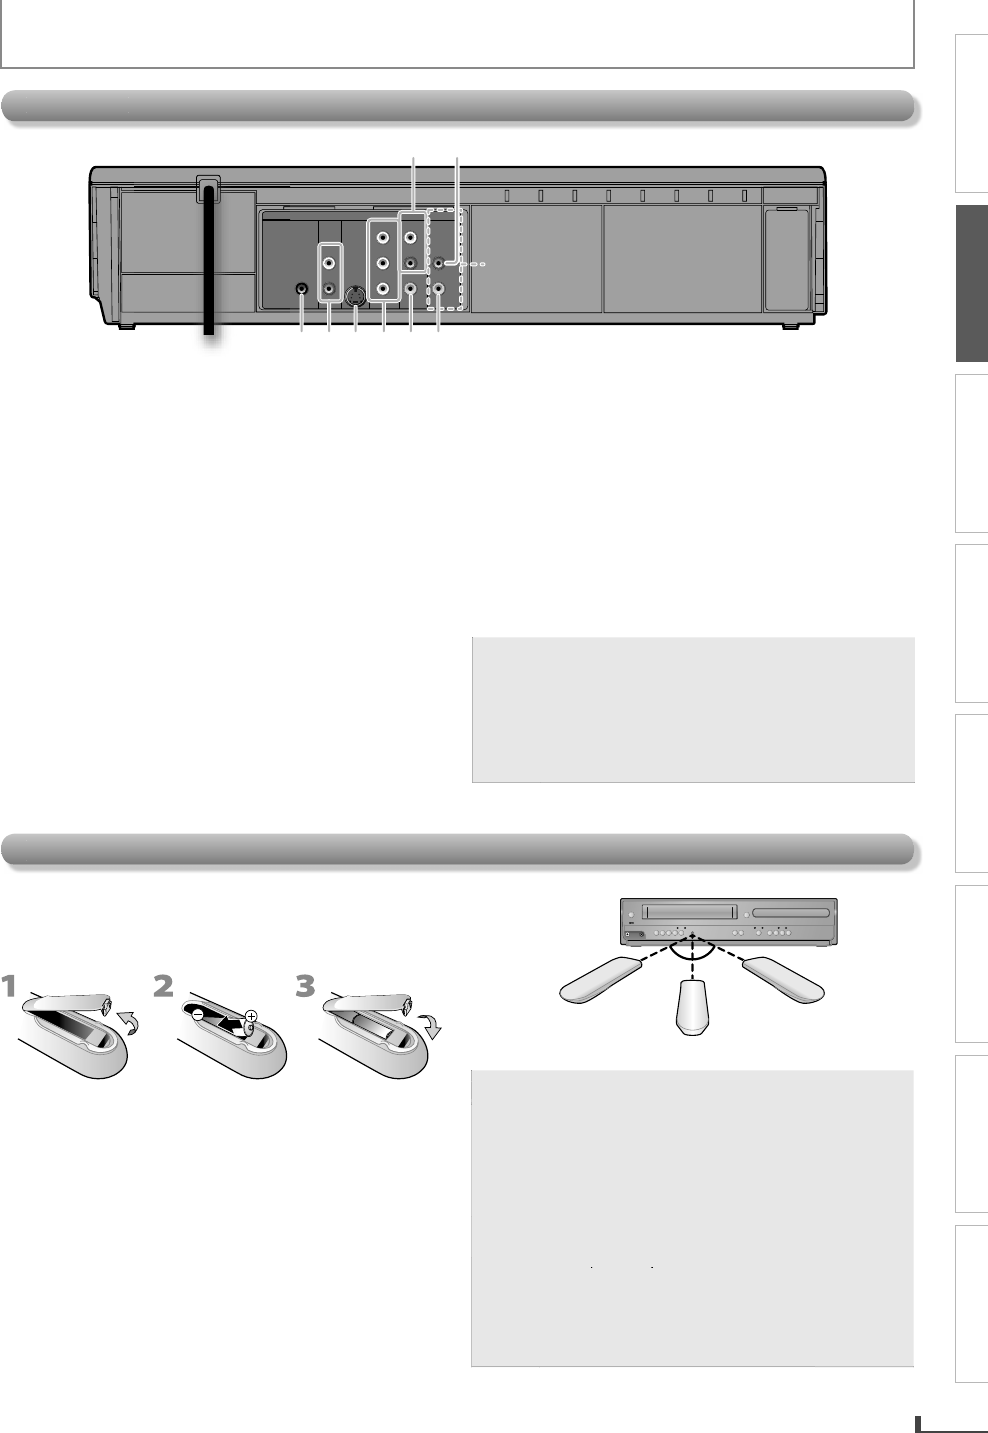
. DVD/VCR AUDIO OUT jac
.1
•
nn
n R
A
i
l
r
m h
r
h
i
input jack o
our television or audio device. Standard
onnection
or DVD
VCR use
2
V
RA
DI
IN jac
.2
•
onnect an RCA audio cable from the audio out
ut
jack of
our camcorder, VCR, etc. to here.
IGITAL A
DI
COAXIAL*
ac
.1
Connect a digital audio coaxial cable
rom here
to the digital audio coaxial in jack o
a decoder or
i
r
iv
r
.
V
AUDIO OUT* (ana
og) jac
p.
•
nn
n R
A
i
l
fr
m h
r
h
i
input jack o
our television or audio device.
VIDE
OUT*
ac
.1
•
nn
n
-vi
l
fr
m h
r
h
-vi
input jack of
our television
COMPONENT VIDEO OUT*
ac
.1
Connect component video cables
rom here to the
omponent video input jacks o
our television.
VD/VCR VIDEO OUT jac
.1
•
nn
n R
A vi
l
r
m h
r
h
IDEO input jack o
our television or audio device.
Standard connection for DVD
VCR use
CR VIDEO IN
ac
.
•
nn
n R
A vi
l
fr
m h
r
h
vi
output jack of
our camcorder, VCR, etc
For enhanced DVD viewin
. DVD/VCR video and audio
connection re
uire
to view cassette ta
es
RCA audio and video cables are included
o
ot
VCR an
DVD viewing. You can en
ance
your DVD picture an
soun
qua
ity wit
an
S-vi
eo ca
e, component vi
eo ca
es, or a
igita
au
io coaxia
ca
e.
ease purc
ase
t
e necessary ca
es at your
oca
store
(Re
er to pages 11-12.
Re
r P
ne
DIGITAL
AUDIO OUT
COAXIAL
AUDIO
OUT
DVD VCR
DVD/VCR
S-VIDEO
OUT
COMPONENT
VIDEO OUT
AUDIO IN
VIDEO IN
AUDIO OUT
VIDEO OUT
L
LY
R
R
C
B
C
R
3 54 6 7 8
L1
12
Install the 2 AA (1.5 V) batteries matching the polarit
indicated inside batter
compartment of the remote
n
r
l
Keep the
ollowing in mind when using the remote
contro
Ma
e sure t
at t
ere are no o
stac
es
etween t
e
remote control and the in
rared sensor window on the
un
t
he maximum operable ran
es of the unit are
Line o
sigh
approx. 23
eet (7m
Either
i
e
f cente
a
rox. 16 feet (5m) within 30
ov
approx. 16
eet (5m) within 15
Bel
x.
10
eet
3m
within 30
16 feet (5m)
30˚30˚
16 feet (5m)
23 feet (7m)
i
n
v
r
hr
w
ri
s in
fir
.
ote
Do not mix di
erent types o
batteries togethe
(e.g., A
a
ine an
Car
on-Zinc) or o
atteries
with
resh ones. Although they may look similar,
di
erent batteries may have di
erent voltages
•
f the remote control is not to be used for a lon
eriod of time, remove the batteries to
reven
damage or injur
from possible batter
leakage
Do not try to recharge batteries; they can
over
eat an
rupture
Batteries should always be disposed o
with
he environment in mind. Always dispose o
atteries in accor
ance wit
app
ica
e
aws
n
regu
ations
Installi
the Batteries for the Remote Contro


