


48 EN48 EN
4
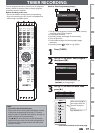
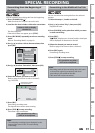
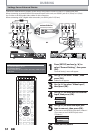
Use [K / L / s / B] or [the Number
buttons] to enter the start and end
time, then press [B].
Date
FEB/05
REC To Mode
HDD SP
SP 2h00m
Start End
- - : - -
CH
DTV69. 1
10 : 30AM
• You cannot make a program whose recording
time exceeds 12 hours.
5
Use [K / L / s / B] to select analog
(“- - -”) / digital (“DTV”) mode or
external input (L1 / L2), then press
[B].
e.g.) external input mode
Date
FEB/05
REC To Mode
HDD SP
SP 1h00m
Start End
CH
L1
11 : 30AM
10 : 30AM
To record from external input (e.g., cable/
satellite box), select L1 or L2.
Use [K / L] or [the Number buttons] to select
the channel number to record, then press [B].
For digital mode, select both major and minor
channels. Refer to “How to select a channel
number for the timer recording” on page 49
for more details.
e.g.) analog mode
Date
FEB/05
REC To Mode
HDD SP
SP 1h00m
Start End
CH
10
11 : 30AM
10 : 30AM
e.g.) digital mode
Date
FEB/05
REC To Mode
HDD SP
SP 1h00m
Start End
CH
DTV69. 1
11 : 30AM
10 : 30AM
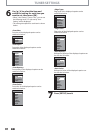
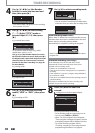
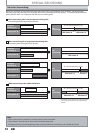
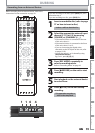
6
Use [K / L] to select the recording
media (“HDD” or “DVD”), then press
[B].
e.g.) recording to DVD
Date
FEB/05
REC To Mode
DVD SP
SP 1h00m
Start
10 : 30AM
End
11 : 30AM
DTV69. 1
CH
7
Use [K / L] to select a recording mode.
Date
FEB/05
REC To Mode
DVD
SP 1h00m
Start End
CH
DTV69. 1
11 : 30AM
10 : 30AM
SP
Refer to “Recording Mode” on page 42.
• You can check the remaining recordable space
of the disc when you select the recording mode.
Date
FEB/05
REC To Mode
DVD
SP 1h00m
Start End
CH
DTV69. 1
11 : 30AM
10 : 30AM
SP
Auto recording mode select...
When “Auto” is selected as a recording mode, the unit
calculates how much time is available on the disc and
selects the best recording mode available
automatically to complete recording the program.
Date
FEB/05
REC To Mode
DVD
Auto 1h00m
Start End
CH
DTV69. 1
11 : 30AM
10 : 30AM
Auto
• “Auto” is only available for one program in the timer
program list.
Alternate recording (DVD only)...
In the following cases, the unit will detect it and
automatically record to the HDD even when DVD is
selected as the recording media.
- If there is no recordable disc in the unit
- If the disc does not have enough space to complete the
recording
- If the material is “copy-once” program and prohibited to
be recorded on a DVD
- If the disc is not available because the repairing process is
canceled halfway
This feature is available only for timer recording. Not
available for one-touch timer recording.
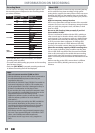
8
Press [OK] when all items are
entered.
will appear on the front panel display.
Timer Programming
1/1
THU FEB/04 11:30AMSP (1:00)
FEB/05/10 10:30 AM 69.01 SP
Date Start End CH
FEB/05 10:30AM 11:30AM DTV69. 1
New Program
Your program setting is now stored.
• To set another program, repeat steps 2 to 8.
• To exit, press [TIMER] or [SETUP].
• When 2 or more programs are overlapped,
“Timer program overlapped” appears, and the
overlapped program will be displayed in blue.
• To correct the timer program refer to
“Checking, canceling, or correcting the timer
programming information” on page 49.
TIMER RECORDING