


21
and select the device on the Touch-
button that you wish to teach into.
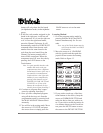
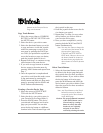
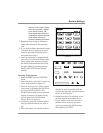
4. Place your original remote control to
the UR12 head to head about 2-3
inches apart. Refer to figure 14.
5. Press either the Device Touch-button
or functional button, whichever you
wish to teach in the UR12. It is now
ready to learn on the button you se-
lected.
6. Press the button on your original re-
mote control that you wish to teach
into the UR12. The UR12 will beep
indicating that it received the signal
and the Touch-button will show RE-
TRY. Please enter the code signal
within 20 seconds of programming.
7. Press the same button on the original
remote control a second time to ensure
correct learning. The UR12 will beep a
second time with GOOD flashed on
the Touch Screen, indicating that it
learned the code correctly. If it flashes
FAIL, repeat from Step 5 until it
learns successfully.
8. Move on to the next button (or device)
you wish to teach by repeating from
Step 5. If you are teaching functional
buttons, you can also move on to teach
the buttons in the next page by press-
ing the PAGE button.
9. Once you complete the teaching and
wish to exit from the leaning mode,
press the MAIN button to go back to
the main page of the learning mode.
Exit from the Main page by pressing
both the MAIN and PAGE buttons si-
multaneously.
10. You will be in the setting mode once
again. Move the cursor to 8. TO EXIT
and press down the cursor or simply
press the MAIN button to exit to the
main menu.
Erasing the Learned Buttons
Erase a single button
1. Go to the program setting mode by
pressing both the MAIN and PAGE
buttons simultaneously for five sec-
onds.
2. Move the cursor to 4. LEARNING
with the joystick and then push the
joystick down to enter the learning
mode.
3. Move the cursor to COMMON BUT-
TON and select the device that con-
tains the functional button you wish to
erase. If you wish to erase the function
System Settings
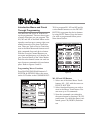
Other Brand Remote McIntosh UR12
2 - 3 inches (5.08 - 7.62 cm) apart
Figure 14