


38
38
2
3
4
6
1
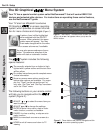
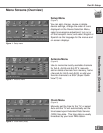
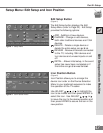
Figure 2. These buttons are used for navigation within
the on-screen operating system.
5
Part III: Setup
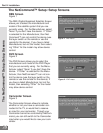
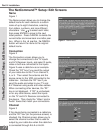
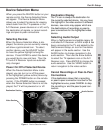
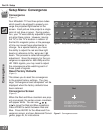
The 3D Graphical Menu System
Your TV also has Mitsubishi’s exclusive
3D Graphical on-screen operating
system, which provides on-screen informa-
tion for menu choices and changes
(Figure 1).
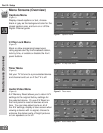
A picture (icon) will be highlighted
when selected with the ADJUST
arrows. When selected, the appro-
priate menu will appear. You may
then make changes within the menu
or access sub-menus, if available.
You may also access submenus from a
button. Sometimes a selection of the
button will start an automatic function.
The system includes the following
special features:
The currently selected icon or button is high-
lighted with a yellow outline and the text color
will be yellow.
On-screen instructions provide complete menu
choice information.
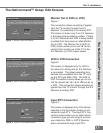
Some on-screen menu options must be set
before other options are available. For exam-
ple, the “Timer” can be set and turned “on”
only after “Set Time” and “Set Day” have been
set in the “Clock ” menu.
The following buttons on your remote control
will help you to navigate within the
system (Figure 2):
1
ADJUST or to select the menu item you
want to change.
2
ADJUST or to change the settings.
3
ENTER to enter into a menu, start an auto-
matic function, or select a checkbox.
4
CANCEL to clear a setting, or stop an auto-
matic function.
5
MENU to move back one menu screen at a
time.
6
HOME to exit all menus and return to TV
viewing.
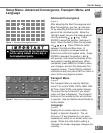
The
Menu System
Your TV has a special control system called NetCommand™ that will control IEEE 1394
devices and selected older devices. For instructions on operating these control features,
see the NetCommand™ guide.
Figure 1. Main Menu: The Main Menu screen will always
be the rst screen t hat appear s when you pr ess t he
MENU button.
CONNECT