4
Step 1:
Connections
the section 6 "Using the multi-zone function" of "Step 3:
Playing Back".
The unit supports the HDMI Through function that allows
transmission from players to the TV even if the unit is in
standby. You have to modify the settings to enable the
input selection link with CEC compliant device, connection
with ARC compatible TV, and HDMI Through function. See
the section 2 "2nd Step : Source Connection" of "Step 2:
Setting Up".
r To enjoy HDCP2.2 protected video, connect the player to
the IN3 jack and the TV to the HDMI OUT MAIN jack of
the unit. Your player and TV need to support HDCP2.2.
r To play 4K or 1080p video, use the high speed HDMI
cable.
r It is possible to send video and audio of an MHL-enabled
mobile device by connecting the MHL-enabled mobile
device to the AUX INPUT HDMI/MHL jacks on the front
panel.
Connecting Components without HDMI
If your AV component does not have HDMI jack, use an
available jack of your component for cable connection with
this unit. Just as the HDMI jacks, other jacks on this unit
have a preassigned input selector button on the front panel.
See the name of the input selector button shown with the
jack when connecting the device.
1
4
6
23
5 7
Audio signal connection
1
Digital connection: Use a digital optical cable
(OPTICAL) or digital coaxial cable (COAXIAL) for
connection with a player.
Digital optical cable (OPTICAL)
¼
As the digital in optical jack of the unit has a
cover, push in the cable against the cover as it is
turned inside.
Digital coaxial cable (COAXIAL)
2
Analog connection: Use an analog audio cable for
connection with a player.
To enjoy multi-zone playback of audio of a CD player
or such other player without HDMI output jack, you
need to use the analog audio cable to connect the
corresponding jacks of the player and this unit. For
details on the multi-zone function, see the section 6
"Using the multi-zone function" of "Step 3: Playing
Back".
Analog audio (RCA) cable
3
Balanced connection: Use an XLR balanced cable for
connection with a player. An XLR balanced cable, which
is less affected by noise when extended over a long
distance, is suitable for long-distance transmission.
¼
Refer to the position indication for connection beside the BALANCE
INPUT jack.
¼
You have to make an appropriate setting to play audio of the device
connected to this jack. For more information, see the Advanced
Manual.
XLR balanced cable
4
Connection with turntable: If it uses an MM type
cartridge and does not have a built-in audio equalizer,
connect it to the
4
PHONO jack. If the connected
turntable has a built-in audio equalizer, connect it to the
2
TV/CD jack.
¼
If it uses an MC type cartridge, install an audio equalizer compatible
with MC type cartridge between the unit and the turntable by
connecting it to the
2
TV/CD jack. For details, refer to the turntable's
instruction manual.
¼
If the turntable has a ground wire, connect it to the GND terminal of
this unit. If connecting the ground wire increases noise, disconnect it.
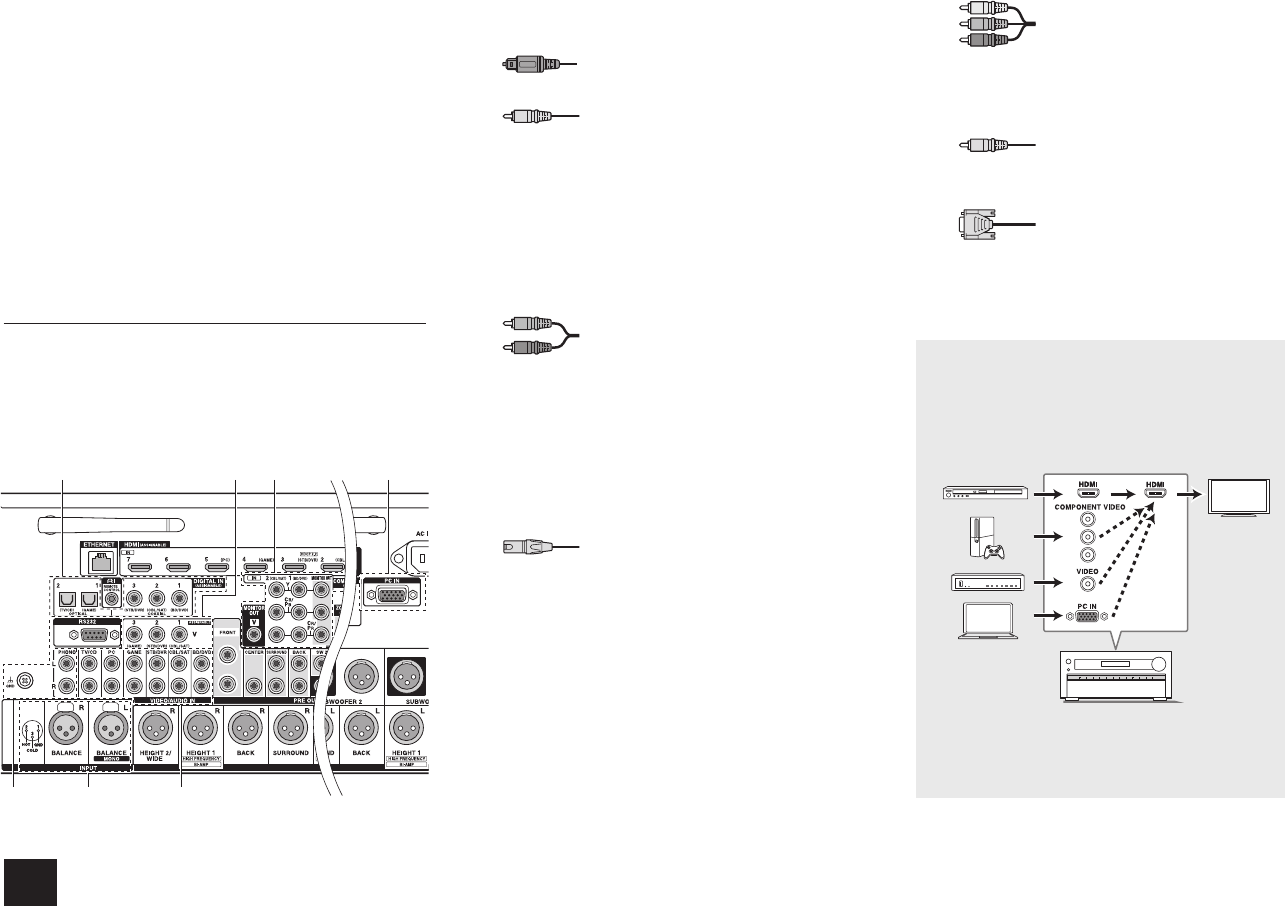
Video signal connection
The unit has a video upconversion function. For details, see
the next section.
5
Use a component video cable to connect a TV
with component video input jacks and a player with
component video output jacks.
Component video cable
¼
Its transmitted video has higher quality than that
of composite video cable.
6
Use a composite video cable to connect a TV with
composite video input jack or a player with composite
video output jack.
Composite video cable
7
Use an analog RGB cable to connect the unit with a PC.
Analog RGB cable
¼
Video signals from the PC connected with the PC IN port will be
output only to a TV connected with the HDMI OUT MAIN/SUB/
ZONE2 jack.
Video signals input to the composite video input jack,
the COMPONENT VIDEO input jack, or the PC IN
port will be upconverted to HDMI signals and then
output from the HDMI output jack. Note that it is
not possible to convert digital audio input signals to
analog or vice versa.
AV Controller
¼
If multiple video signal inputs are put into one input
system, the output will be made in the order of HDMI,
component video, and composite video.


