RQT7584
14
Using On-Screen Menus
The items displayed will depend on the actual connection and disc.
∫ Play Menu
(Only when the elapsed play time can be displayed
[JPEG]: The Repeat and Marker functions can be used.)
∫ Picture Menu
123 4
Select the menu. Make the settings. Press to exit.
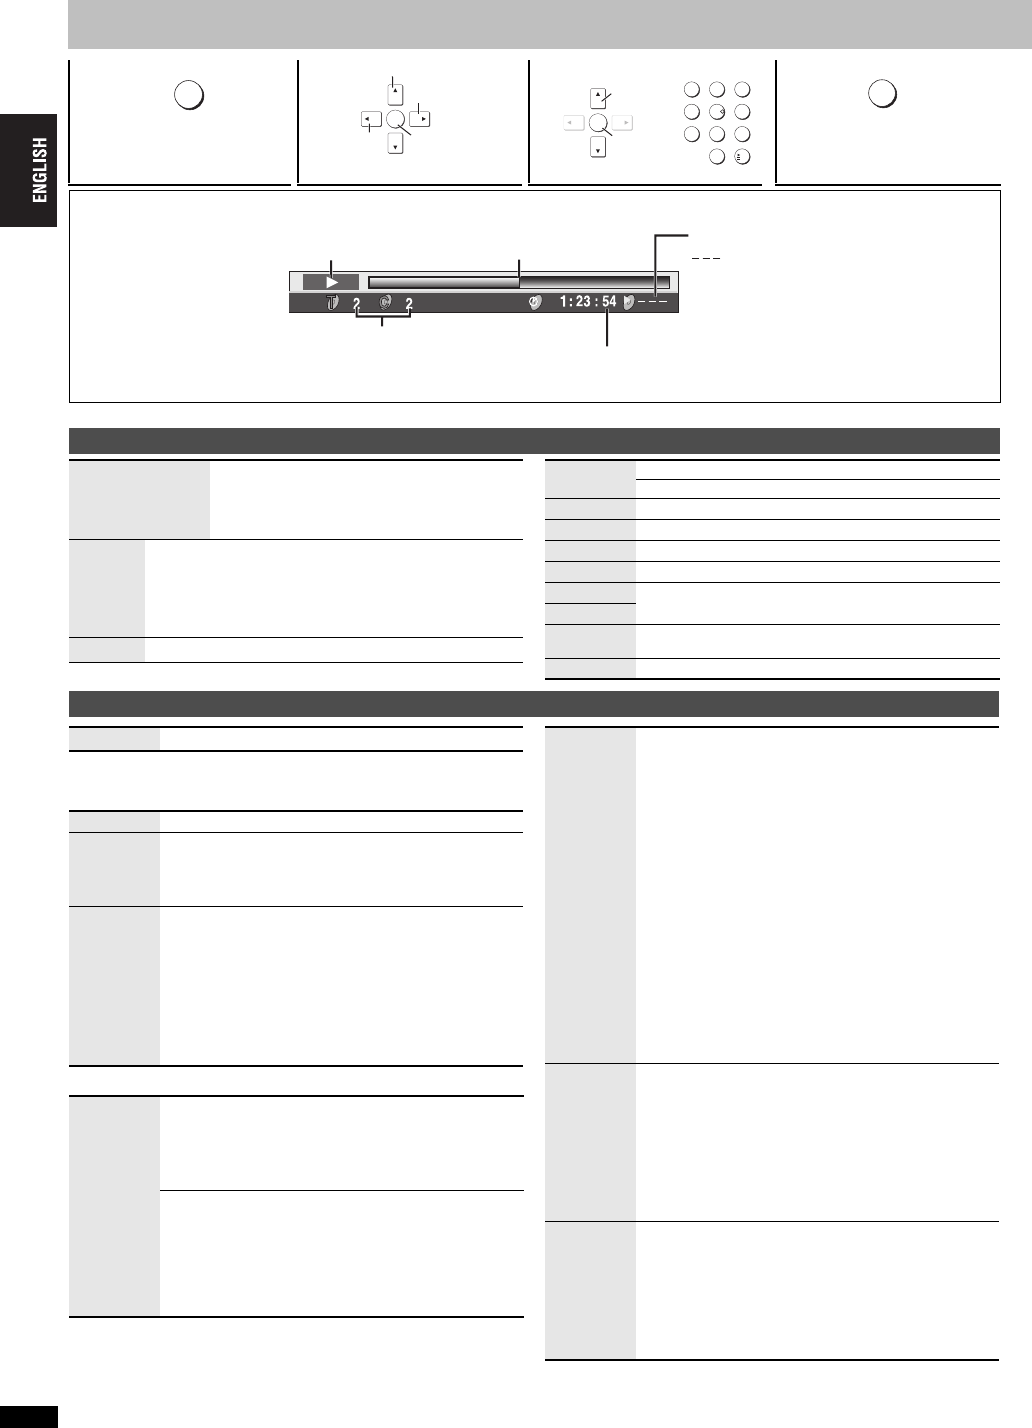
∫ Elapsed play time indicator
Main Menus
DISPLAY
ENTER
Select
Go to the next
menu
Register
Return to the
previous menu
123
456
789
0
10
ENTER
Register
Select
RETURN
Play back condition
Current playback number
Elapsed play time/Remaining time
Press [3 4] to change the display.
(Shows only elapsed play time for WMA, MP3 and SVCD.)
: Normal play
ALL: All group play [DVD-A]
PGM: Program play
Current position
Play mode
RND: Random play
PBC: Playback control play [VCD]
Program/Group
Title/Chapter
Track/Playlist
Content
To start from a specific item
Time
To skip incrementally or decrementally (Time Slip for play only)
1. Press [ENTER] twice to show Time Slip indicator.
2. Press [3 4] to select the time and press [ENTER].
≥Press and hold [3 4] to alter faster.
To start from a specific time (Time Search)
To change remaining/elapsed time display
Video
To display pixel number
Audio
(➜ page 11)
To display the current bitrate or sampling frequency
Still Picture
To switch still picture
Thumbnail
To show thumbnail images
Subtitle
(➜ page 11)
Marker (VR)
To recall a marker recorded on DVD-Video recorders
Angle
(➜ page 11)
Rotate picture
Slideshow
To turn on/off slideshow
To change the slideshow timing (0–30 sec)
Other Settings
(➜ below)
Other Settings
Play Speed
(➜ page 10)
Repeat
Select an item to be repeated.
A-B
Repeat
To repeat a specified section
Press [ENTER] at the starting and ending points. Press
[ENTER] again to cancel.
≥[RAM] (still picture part): Does not work
Marker
Except
[RAM]
To mark up to 5 positions to play again
Press [ENTER]. (The unit is now ready to accept
markers.)
To mark a position: [ENTER] (at the desired point)
To mark another position:[21] to select “¢”➜ [ENTER]
To recall a marker: [21] ➜ [ENTER]
To erase a marker: [21] ➜ [CANCEL]
≥
This feature doesn’t work during program and random play.
≥
Markers you add clear when you open the disc tray or
switch the unit to standby.
Picture
Mode
Normal
Cinema1:
Mellows images and enhances detail in dark scenes.
Cinema2:
Sharpens images and enhances detail in dark scenes.
Animation
Dynamic
User
(Press [ENTER] to select
“Picture Adjustment”
) (
➜
below)
Picture Adjustment
Contrast/Brightness/Sharpness/Color (➜ page 9)
Gamma (Adjusts the brightness of dark parts.)
Depth Enhancer
Reduce the rough noise in the background to give a
greater feeling of depth.
MPEG DNR/3D-NR (➜ page 11, Reducing noise in
pictures)
Video
Output
Mode
With HDMI connection (When “HDMI Video Mode” is
set to “On”) (➜ page 17, “HDMI” tab)
Video recordings will be converted to, and output as, high
definition video.The picture quality will vary depending on
the connected equipment. Choose the picture quality to
your preference.
480p (progressive) 720p (progressive)
1080i (interlace)
≥“¢” will be displayed next to those video outputs
possible with the connected equipment. Selecting an
item without “¢” can result in the picture being distorted.
Should the picture be distorted, press and hold
[CANCEL] until the picture is displayed correctly.
The setting will return to “480p”.
≥Output from the COMPONENT VIDEO OUT terminal
will be “480i”.
With HDMI connection (When “HDMI Video Mode” is set
to “Off”) (
➜
page 17, “HDMI” tab) or other connections
480i (interlace) 480p (progressive)
When you select “480p”and a confirmation screen
appears, select “Yes” only if connecting to a progressive
output compatible television.
Transfer
Mode
If you have chosen “480p”, “720p” or “1080i” (
➜
above),
select the method of conversion for video output to suit the
type of material.
Auto1 (normal): Detects 24 frame-per-second film
content and appropriately converts it.
Auto2: Compatible with 30 frame-per socond film
content in addition to 24 frame-per-second film
content.
Video: Select when using Auto1 and Auto2, and the
video content is distorted.
HDMI
Color
Space
With HDMI connection (When “HDMI Video Mode” is
set to “On”) (➜ page 17, “HDMI” tab)
The picture quality will vary depending on the connected
equipment. Choose the picture quality to your preference.
Should one of the items below not be possible with the
connected equipment it will not be displayed.
RGB YCbCr (4:4:4) YCbCr (4:2:2)
≥“HDMI RGB Range” (➜ page 17, “HDMI” tab) is
available when “RGB” is selected.
Press once.
(When pressed twice, the elapsed
play time indicator appears.
➜
below)
14


