


Replacement
ENGLISH -
63
Maintenance
Replacing the unit
Air lter unit
J
Filter prevents dust from accumulating on the optical elements inside the projector. Should the lter become
clogged with dust particles, it will reduce cooling fans’ effectiveness and may result in internal heat buildup
and adversely affect the life of the projector.
If a “Filter warning” icon appears on the screen, replace the air lter unit immediately. Replace it with the
separately sold ET-RFT100 replacement lter unit. Consult your supplier when you purchase a replacement lter.
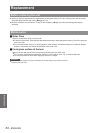
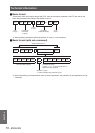
Replacement of the air lter unit
J
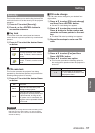
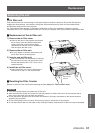
Remove the air lter cover.1 )
Clean up the dust on the projector and around
z
the air vents. Press and hold the right-hand
corner of the filter cover, and then press
◄ leftwards on the filter cover to release the
latch and open the filter cover.
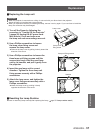
Remove the air lter unit.2 )
Put your fingers on the filter tab and then pull
z
the air filter unit out of the projector.
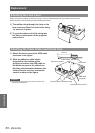
Insert a new air lter unit.3 )
Insert the new filter unit completely by following
z
the instructions for step 2 in the reverse order.
Ensure that the area with “TOP” mark is in an
upward direction.
Install the air lter cover.4 )
Insert the air filter unit cover by following the
z
instructions for step 1 in the reverse order.
Resetting the Filter Counter
J
Be sure to reset the Filter counter after replacing the lter.(
Æ
page 59" Filter counter reset")
Attention
Turn off the power before you replace the air lter unit.
z
When attaching the air lter unit, make sure that the projector is stable, and work in an environment that is
z
safe, even in the event of the air lter unit dropping.
Do not operate the projector with the air lter unit removed. Dust may accumulate on the optical elements
z
degrading picture quality.
Do not put anything into the air vents. Doing so may result in malfunction of the projector.
z
Do not wash the air lter unit with water or any other liquid matter. Otherwise the air lter unit may be damaged.
z
Latch
Filter cover
Pull out and
remove.
TOP mark