


- 8 -
TC-14B10P / TC-20B10PService Adjustments and Calibrations
2.7- Apply a PHILIPS pattern.
2.8- Adjust BRIGHT, SUB BR, in CHQ5, SCREEN to
obtain normal image.
2.9- Check if horizontal width is normal
2.10- Select SUB BR in CHQ5 and check if BRIGHT is
controlled by varying SUB BR in CHQ5.
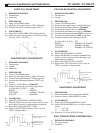
2.11- Select HORIZONTAL CENTERING (HC) in CHQ3
(Service Mode) and adjust convergence.
2.12- Select VERTICAL CENTERING (VC) in CHQ3
(Service Mode) and adjust convergence.
3- PRÉ AJUSTE DO AGC RF.
3.1- Apply a PHILIPS pattern.
3.2- Adjust the signal level to 65±2bB (75Ω open).
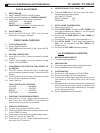
3.3- Select RF AGC in CHQ4 Service Mode and increase
it pressing VOL(+). Verify if snow appear when the
RF AGC register is increased. Then decrease it slowly
by using VOL(
_
) until the snow has disappeared.
CUT OFF - PRE ADJUSTMENTS
1- REQUIRED EQUIPMENTS.
1.1- Oscilloscope.
1.2- Connect oscilloscope between TPY1 (Q352-C) and
ground.
1.3- Position controls/adjust following the information
below:
R HIGH LIGHT (R-DR)..................40H
B HIGH LIGHT (B-DR)...................40H
R LOW LIGHT (R-CUT).................000H
B LOW LIGHT (B-CUT).................000H
G LOW LIGHT (G-CUT)................ 125H
COR...............................................MINIMUM
CONTRASTE................................ MAXIMUM
SCREEN........................................MINIMUM
1.4- Apply a PHILIPS pattern.
1.5- Press 5 at the remote control to obtain a simple
horizontal line
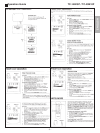
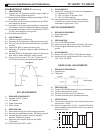
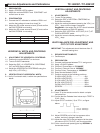
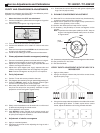
1.6- Adjust G-CUT to obtain a reading at TPY1, as figure
below.(*)
1.7- Adjust SCREEN until a first line appears at the screen,
and dont change it after this.
1.8- Adjust the other DACs that match the other two
colours (R-CUT, B-CUT) until it turns the line white.
1.9- Exit to Normal Mode pressing NORMAL at the remote
control.
1- SOUND INSPECTION
1.1- Verify if sound varies correctly pressing VOL(+) or
VOL(
_
).
1.2- Verify if tone is adjusted using the TONEcontrol at
the SOUND Menu.
2- INSPECTION OF COLOUR CONTROL
2.1- Apply a PHILIPS pattern.
2.2- Select Pic. Menu DYNAMIC, and adjust NORMAL
IMAGE using the remote control.
2.3- To access the function NORMAL IMAGE press MAIN
MENU and next press the < or > navigation keys to
select the function IMAGE.
Press the navigation keys to enter menu. Press the
N key at the remote control to activate function
NORMAL IMAGE.
2.4- Verify if saturation is normal and sufficcient.
2.5- Confirm the variation of the colour phase acting at the
TINT control, receiving NTSC pattern.
3- OTHER INSPECTIONS.
3.1- Tune the VHF, UHF and CATV channels and check if
there is good reception.
3.2- Press the key TV/VIDEO and verify ON SCREEN.
3.3- Return to the TV Mode.
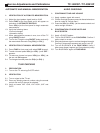
CALIBRATION OF VIDEO IF
1- REQUIRED EQUIPMENT
1.1- Monitor
1.2- VIF generator
1.3- VIF detector
1.4- Power source of 9,0 ±0,1V and 4,0 ±0,1V
1.5- Bias box to AGC
1.6- Resistor Jumper of 1KΩ
CONEXIONS
0V
(
*
) 20 inch 160 ± 2Vo-p
(
*
) 14 inch 140 ± 2Vo-p
<