


28
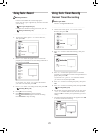
3 Weekly
A weekly calendar will be displayed on screen Select
desired day(s), then press OK to confirm your selec-
tion. When completed, select ‘‘OK’, then press OK.
You can select more than one day for the weekly mode.
For example, if your desired programs are broadcast
every Thursdays and Fridays, you can assign the timer
setting only once by selecting both Thursday and
Friday.
Timer_03_01
If you select ‘Daily’ or ‘Weekly’ as the recording
mode, it is suggested to proceed with further setting to
your Timer Programs. Press
to select ‘Ad-
vanced’, then press OK. If you would like to designat-
ed a period of time to the timer program, select ‘With
Restriction’ . Otherwise, select ‘Without Restriction’.
For the recording result of setting restriction, see:
Timer Recording Frequency (p.42)
6. When completed, select ‘OK’, then press OK to save
the setting and return to the Timer menu, or select
‘Cancel’, then press OK to discard current setting.
If there is any setting invalid(except overlap of timer
programs), the ‘OK’ button will be disabled. Press
to modify your settings.
For overlap of timer programs, see:
Notice for Timer Recording (p.29)
7. On the Timer Record menu, select another item on the
list, then press OK, if you would like to set up more
timer programs.
If not, select ‘Exit’, then press OK. Or press TIMER
to exit the Timer Record menu.
8. Switch off the DVD recorder to activate the timer
recording function.
If you would like to delete a timer program set previ-
ously, go to Timer Record menu, highlight the bin
icon located in the first column of the entry you want
to delete, then press OK.
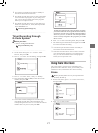
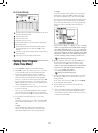
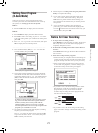
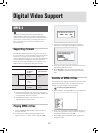
G-Code Mode
Timer_01_02
Storage capacity available on the destination disc for a
particular recording mode.
Current system date.
Current system time.
The page you are viewing.
The G-Code number of your desired TV program(s).
Recording mode.
Indicate function of canceling designated program
setting. Highlight this icon and press OK to clear
settings.
Indicates a new Timer Program. Press to start setting a
Timer Program.
Exit: Press to exit the Timer Record menu.
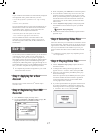
Setting Timer Program
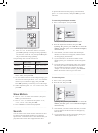
(Date/Time Mode)
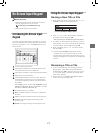
1. Press TIMER to display the Timer Record menu.
2. Press
OK to start a new setting, or press to select
a previous setting which you would like to modify.
3. Set ‘Source’ (Signal Source), ‘Mode’ (recording
mode), ‘Repeat’ (recording frequency) ‘Start’ (Start
Time) and ‘End’ (End Time) for the timer program.
Press
to select one of the settings, then press OK
to go to the sub-menu. Press to select, then press
OK to confirm your selection. To enter numbers, press
number buttons (0-9) or .
4. If ‘TV’ is selected as the signal source, you will need
to enter TV channel.
Press or number buttons (0-9) to select ‘Channel’
(TV Channel), then press OK to go to the sub-menu.
Press to select, then OK to confirm your selection.
5. For ‘Repeat’ (recording frequency), if you select...
1 Once
You need to set the date. Go to ‘Date’, then press OK.
Press number buttons (0-9) or to enter the
date.
2 Daily
The Timer Record program will be automatically
set for each day until the setting is cancelled or the
destination medium has no more storage capacity.