


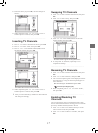

25
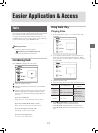
Recording
Recording from TV
1. Refer to ‘Recording: Step by Step’ for the procedures
of recording on a disc from TV.
Recording: Step by Step (p.24)
When the DVD recorder is switched on during record-
ing, you can only view the recorded channel on screen.
If you would like to watch a different TV channel, you
can do so by switching your TV’s input source to tuner
device (e.g. antenna, cable box or satellite box). This
will not affect the recording already in progress. For
further information on how to change the input source,
please check the instruction manual offered by your TV
manufacturer.
Recording from External
Devices
Before you start...,
• Refer to ‘Recording: Step by Step’ for the basic
procedures of recording on a disc.
Recording: Step by Step (p.24)
..........................................................................................
Recording from VCR/V8 Cam-
corder/DVD Player
1. Press SOURCE repeatedly to select the correct signal
source.
Recording_02_03
2. Cue the external device and start playback at the
beginning of the scene you wish to record.
3. Follow the gereral operation to start recording.
..........................................................................................
Recording from DV (Digital
Camcorder)
• The DV-Link INPUT jack on this recorder is for use
with DV-compatible camcorders only, and not to be used
for connecting any other firewire devices.
• Only DV signals can be input to the DV-Link jack on
this DVD recorder.
• Do not connect a MICRO MV format video camcorder
to the DV-Link jack.
• Despite the technology endeavour with which this DVD
recorder is built, it is still likely that your DV may not
be fully supported by the unit. If you still experience
problem using the DV-Link for recording, please
connect your DV via S-Video or composite cables to
this DVD recorder.
• The DVD recorder is equipped with a camcorder control
(Play, Stop, REW or FFW) feature via the DV-Link con
-
nection. Simply move the screen cursor to the desired
function on the DV input screen, then press OK on the
remote control.
..........................................................................................
1. Press SETUP to display the Setup menu.
Select recording mode through Recording Record-
ing Mode.
Recording Mode (p.42)
2. When completed, press SETUP to exit the Setup menu.
3. Press SOURCE repeatedly to select ‘DV’ as the signal
source.
The DV Control panel will be displayed.
4. Cue the DV and start playback at the beginning of the
scene you wish to record.
5. Follow the gereral operation to start recording.
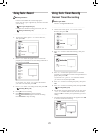
One-Touch Recording
1. When all recording settings are confirmed, press
RECORD twice to instantly start a 30-minute
recording session.
2. For longer recording hours, press RECORD repeat-
edly, which will offer you a length option of up to 6
hours in 30-minute increments.
‘One-Touch Recording’ will start with the DVD
recorder’s default settings, if you do not make any
setting changes before activating this function.
The overall recording time depends on the selected
recording mode and the storage capacity available on
the disc.
Recording will stop automatically when there is no
more space on the disc or after 6 hours of recording
(whichever happens first).