


English
8 Hookups
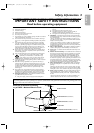
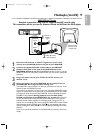
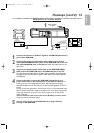
Determining the best possible connection...
Your hookup will be determined primarily by your existing equipment,especially your TV.These guidelines describe
which options have the best picture and sound quality.You will not use all the jacks on the DVD/VCR.
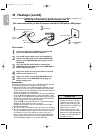
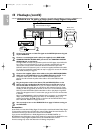
If your TV only has an RF-style jack,usually labelled Antenna In,RF In or 75 ohm, use the ANT-OUT jack
of the DVD/VCR to connect to the TV.This hookup provides both audio and video in a single cable. Set
your TV to channel 3 or 4 - the output channel of the DVD/VCR.This connection allows you to use both
the DVD and VCR features. See page 9.
★★★★ If your TV has Component Video In jacks (which could be labelled Y CR CB,Y PR PB or YUV and may be
green,blue and red),use the Component Video jacks (Y C
B/PB CR/PR) for the best picture quality.If you use
only this video connection,only the DVD picture will be available.To see DVD features on the TV,set the TV
to its Component Video In channel. Component Video provides the best picture quality.See page 12.
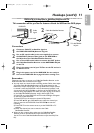
Progressive Scan provides less flickering and higher image resolution than traditional (525i/480i or interlace)
TV signals.
If your TV has Progressive Scan (525p/480p or progressive),connect the TV to the DVD/VCR’s
COMPONENT VIDEO OUT (Y C
B
/P
B
C
R
/P
R
) jacks. Set PROGRESSIVE to ON in the DVD/VCR’s DISPLAY menu.
See pages 53-54. P.SCAN will appear on the DVD/VCR’s display panel.Set your TV to Progressive Scan also
.
If your TV does not have Progressive Scan but has Component Video In jacks,connect them to
the DVD/VCR’s COMPONENT VIDEO OUT jacks (Y C
B/PB CR/PR).Set PROGRESSIVE to OFF either in the
DISPLAY menu or by pressing and holding PLAY B (DVD) on the front of the DVD/VCR for more than 5
seconds. See pages 53-54.
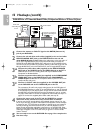
★★★ If your TV has an S-Video In jack (which also may be labelled Y/C or S-VHS), use the S-VIDEO OUT jack for
excellent picture quality.If you use only this video connection,only the DVD picture will be available.To see
DVD features on the TV,set the TV to its S-Video In channel. See page 12.
★★ If your TV has a single yellow Video In jack (which also may be labelled CVBS, Composite or baseband),use
the yellow DVD/VCR VIDEO OUT jack for good picture quality.This connection provides a picture for both
the DVD player and the VCR.To see DVD or VCR features on the TV,set the TV to its Video In channel. See
page 10.
★★★★ If you have a Stereo with a Coaxial Digital Audio In jack, this provides the clearest sound for the DVD player.
Connect the DVD/VCR’s COAXIAL DIGITAL AUDIO OUT jack to your Stereo for the best sound quality.If
you use only this audio connection,only disc sound (no VCR) will be available. See page 14.
★★★ If digital audio connections are not possible, connect the DVD/VCR’s red and white DVD/VCR AUDIO OUT
jacks to the Audio In jacks of your Stereo or TV.This connection provides sound for both the DVD player
and the VCR. See pages 12-13.
Before you begin...
● Refer to the manuals of your TV,Cable Box,Stereo or other devices as necessary. Note the style of jacks and
connectors on the other equipment. Determine how to choose different Audio and Video In channels on your
other equipment so you can see and hear the DVD/VCR material playing on the TV,Stereo,etc.
● Disconnect all equipment from the power outlets.Connect the equipment to power only after you have finished
hooking up everything. Never make or change connections with equipment connected to power.
Remember...
● Set the TV to the correct Video In channel.Such channels may be called AUX or AUXILIARYIN,AUDIO/VIDEO or
A/V IN, EXT1 or External In,etc.These channels often are located near channel zero (0).Or,your TV’s remote may
have a button or switch that selects the Video Input channel. See your TV manual for details. If you do not see the
DVD or VCR playback on the TV,go to the lowest TV channel (01 or 02) and change channels downward until you
see the DVD or VCR picture on the TV.Or,if your TV has only a single Antenna In jack and you are using the RF
coaxial cable (as described on page 9), set the TV to channel 3 or 4.
To help you find the right Audio/Video In channel,turn on the DVD/VCR.Press DVD to put the DVD/VCR in DVD
mode.With no disc in the player,a large DVD Video logo will appear on the TV screen when you get the TV on the
correct Audio/Video In channel or channel 3 or 4.
● Set the Stereo to the correct channel or “source” mode.
● Depending on your connection,you may need to purchase additional cables or adaptors.If your TV or monitor has
BNC-type connectors, you will need an adaptor.
● To use the VCR features,you must include a connection with the supplied yellow video cable and
red/white audio cables or with the supplied RF coaxial cable.
Once you determine the best option,find your choice on pages 9-14.Follow the steps for the hookup
you choose.Then, go to page 16 to complete the first-time setup.
H982NUD_EN1 3/2/06 6:56 PM Page 8