


English
– 11 –
EN / 2A01
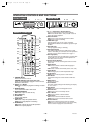
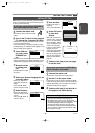
OPERATING CONTROLS AND FUNCTIONS
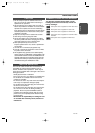
CD: Lights up when an audio CD is
inserted.
VCD: Lights up when a VIDEO CD is
inserted.
Lights up when the A-B repeat function is on.
Lights up when the inserted disc
is being played back.
Displays the elapsed playback time of the current
title or track.
When a chapter or track has switched, the number
of a new title, chapter or track is displayed.
(in the search mode or when the skip up/down button
is pressed.)
Lights up when the repeat function is on.
Lights up when a DVD is inserted.
Lights up when disc
playback is paused.
Lights up when
a PlayBack
Control is on.
TITLE
REPEAT
A
–
B
CHP. TRK.
DVD
VCD
PBC
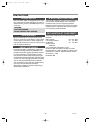
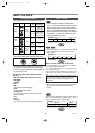
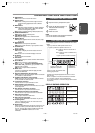
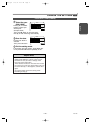
This display appears when the HDR1000 is in DVD
mode.
Power on
No disc inserted
Tray open
Tray closed
Loading the Disc
DVD DIGITAL DISPLAY
DISPLAY DURING OPERATION
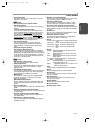
27.TIMER Button
HDD: Press to turn on the Timer screen.
28. ANGLE Button
DVD: Press to change the camera angle to see the
sequence being played back from a different
angle.
29. MODE Button
DVD: Activates program playback or random playback
mode when playing CDs or MP3.
Sets the SRS
TruSurround during DVD playback .
HDD: Press to select Recording mode(HQ,SQ or LP)
30. SEARCH MODE Button
DVD: Press to locate a desired point.
31. A-B REPEAT Button
DVD: Repeats playback of a selected section.
32. REPEAT Button
DVD: Repeats playback of the current disc, title, chap-
ter or track.
33. RETURN Button
DVD: Returns to the previous operation.
HDD: Press to clear window, or go to previous menu.
34. CLEAR Button
Reset a setting.
35. DISPLAY Button
DVD: Press to display the current status on the TV
screen.
HDD: Press to turn On Screen Display on and off.
36. OK Button
Press to execute the selection.
37. DVD Button
Press before using the remote control for DVD features.
38. GO TO Button
HDD: Press to move to LIVE broadcasting.
39. SKIP or (Forward or Backward) Button
DVD: Press during playback to go to previous or sub-
sequent track or chapter.
HDD: Press to skip forward or backward.
40. Mains Cord
Connect to a standard AC outlet to supply the main
power to the HDR1000.
41. OPTICAL DVD DIGITAL OUT Connector
DVD: Connect to the Optical Digital Audio In connector
of a decoder or audio receiver.
42. COAXIAL DVD DIGITAL OUT Connector
DVD: Connect to the Coaxial Digital Audio In connec-
tor of a decoder or audio receiver.
43.Y/C OUTPUT Connector
Connect to the Y/C Input connector of a TV.
44. AUDIO OUTPUT (L/R) Connectors
Connect to the Audio Input connectors of a TV or other
audio equipment.
45. Euro SCART1 Connector (To the TV)
Connect to the 21-pin scart connector of a TV.
46. Euro SCART2 Connector (From decoder)
Connect to the 21-pin scart connector of a decoder.
47. ANT(enna) IN Connector
Connect your antenna or cable here.
48. ANT(enna) OUT Connector
Connect to the ANTENNA IN connector on your TV.
49. Ventilating Holes
There is a cooling fan in the unit. Take care not to
block the ventilating holes.
50. Reset Button
When the HDR1000 does not operate at all even if you
press any buttons, press this button with the tip of a
pen etc. The hard disc setting of HDR1000 will reset.
Then, press STANDBY button to turn on the
HDR1000.
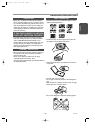
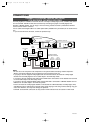
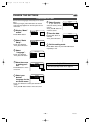
Open the battery compartment cover.
Insert two R6 (AA) batteries, as
indicated inside the battery
compartment.
Close the cover.
NOTE
• Do not mix alkaline and manganese batteries.
• Do not mix old and new batteries.
LOADING THE BATTERIES
E4310.QX3 02.8.22 11:19 AM Page 11