


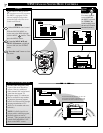
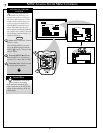
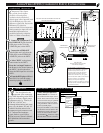

AUDIO/VIDEO NTSC ANALOG CONNECTIONS
SOURCE
EXIT
UP
CH
CH
DOWN
+
VOL
VOL
–
M
4
NTSCNTSC
++
++
mute
volume
channel
AUX 3AUX 3
AUX3
VIDEO IN
L
AUDIO IN
R
2
1
power
DTV
Analog
DTV1/3
sleep
alt audio
status
ext input
freeze
analog format
3
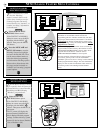
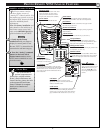
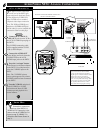
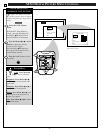
AUX 3 INPUTS
FRONT AUDIO/VIDEO JACKS
AUX3 Inputs located on right
front side panel of DPTV.
VIDEO IN
(YELLOW)
AUDIO IN
(RED/WHITE)
If you have a single (monaural) Audio Output
Camcorder, "Y" connectors are available to complete
your connection. Contact your dealer, or our Parts
Information Center (1-800-292-6066) to order any
optional accessories.
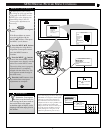
CAMCORDER
PICTURE AND SOUND FROM PLAYBACK OF
CAMCORDER TAPE
AUDIO/VIDEO
OUTPUT JACKS
ON CAMCORDER
31
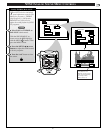
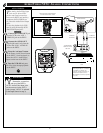
F
or more convenient Direct
playback connections use the
DPTV's Front Audio/Video Input
panel (located on the DPTV's right
front side panel). These Inputs
allow for quick and easy access,
particularly for the playback of
Camcorder tape recordings.
Connect the VIDEO OUT jack
from the Camcorder to the AUX3
VIDEO IN jack on the DPTV.
Connect the AUDIO OUT
jacks R(ight) and L(eft) from the
Camcorder to the AUX3 AUDIO
IN jacks on the DPTV.
Press the “ext input” button
on the Pronto (or the Source button
on the DPTV’s local keyboard) to
select the AUX3 Audio/Video
Inputs on the DPTV.
Turn the Camcorder ON and
press PLAY to view the tape on
the DPTV.
1
2
3
4
STOP
BEGIN
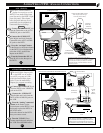
ANALOG
TV ANT/CABLE
AUX 1 AUX 2
S-VIDEO
ANALOG
AUDIO OUT
AUDIO INPUT
AUX 1 AUX 2
VIDEO OUT
VIDEO INPUT
L
R
L
R
NTSCNTSC
++
++
mute
volume
channel
ANTENNA
OUT
IN
OUT
IN
AUDIO
R
L
VIDEO
IN
OUT
1
2
4
power
DTV
Analog
DTV1/3
sleep
alt audio
status
ext input
freeze
analog format
3
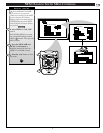
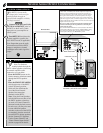
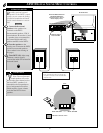
AUDIO/VIDEO OUTPUTS
REAR OF DPTV
VIDEO OUT
(YELLOW)
VCR
PICTURE AND SOUND BEING RECORDED ON VCR
AUDIO/VIDEO INPUT
JACKS ON VCR
AUDIO
OUT
(RED/
WHITE)
T
he Audio/Video Output jacks
on the DPTV can be used to
record TV programs on VCRs
which have Audio/Video Input
jacks. To use the Audio/Video
Outputs for program recording:
Connect the VIDEO OUT jack
from the DPTV to the VIDEO IN
jack on the VCR.
Connect the AUDIO OUT
jacks R(ight) and L(eft) from the
DPTV to the AUDIO IN jacks on
the VCR.
Press the “Analog” command
button on the Pronto (or the
Source button on the DPTV’s local
keyboard) to place the DPTV in
the NTSC mode.
Select the channel on the DPTV
that you want to record.
Turn the VCR ON. Put a
cassette tape in the unit and place
the VCR in the RECORD mode.
STOP
1
2
3
4
BEGIN
Remember, if the VCR has an INPUT SELECTOR
switch, place it in the LINE or CAMERA position.
Note: Unattended Timer Recordings with a VCR are
possible, but not recommended with this connection
since the DPTV must be left ON for the VCR to record.