


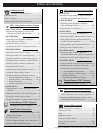
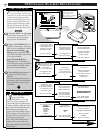


NTSC/ANALOG ON-SCREEN MENU FEATURES
SOURCE
EXIT
UP
CH
CH
DOWN
+
VOL
VOL
–
M
FEATURES
EXIT
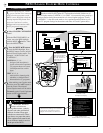
ANALOG MAIN MENU
SOUNDPICTURE
1ST TIME SETUP
NTSCNTSC
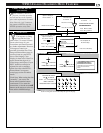
Many of the current TV
control settings will be
modified by continuing
with First-Time Setup.
Press STATUS to Quit
or
Press "M" to Continue
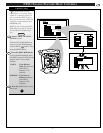
The First-Time Setup
provides a simple method
of adjusting the most
important controls for
this television receiver.
Press "M" To Continue
This TV is equipped with
the Smart Clock feature.
This feature is designed
to operate only on the
analog TV antenna.
Press "M" to Continue
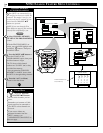
Please check that your
analog TV antenna or cable is
connected to the plug
marked ANT on
the TV rear input panel.
Press STATUS to Quit
or
Press "M" to Continue
OR
System is testing for
correct tuning mode
for the analog TV antenna.
* Please Wait *
1
System is searching for
all active channels
for the analog TV antenna.
* Please Wait *
Testing channel 2
in cable mode.
The search for active
channels is complete
for the analog TV antenna.
17 channels were found
and saved in memory
.
Press "M" to Continue
This TV contains a clock
which can automatically
be set through the
SMART CLOCK feature.
The clock will be set
to the time broadcast
by certain TV stations.
Press "M" to Continue
Do you want to set the
clock automatically?
Press "▲ ▼" to Select
Press "M" to Continue
SET TIME AUTOMATICALLY
SET TIME MANUALLY
Press "▲ ▼" to select the
time zone that you live in.
ATLANTIC
EASTERN
CENTRAL
MOUNTAIN
PACIFIC
ALASKA
HAWAII
Press "M" to Continue
Do you observe
Daylight Savings Time?
Press "▲ ▼" to Select
Press "M" to Continue
YES
NO
The time is broadcast by
certain TV stations
We suggest trying PBS first
Enter the channel
Press "M" to Continue
X
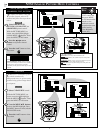
FIRST TIME SETUP
6
ok
exit
menu
DTV
Analog
DTV3/3
FEATURES
EXIT
MAIN MENU
SOUNDPICTURE
1ST TIME SETUP
1
3
2
2
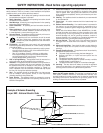
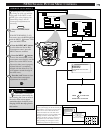
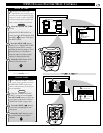
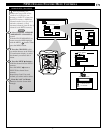
Press the Pronto remote’s
“analog format” (or the
“Source” button on the
DPTV keyboard) to select the
NTSC operating mode.
F
irst Time Setup automatically takes
care of some basic control feature
settings for you. Follow the steps in this
section to quickly add area channel
numbers into the DPTV's scan system
memory, and set the DPTV for your
connected signal (Antenna or Cable.)
You can also set-up your TV Smart
Clock feature for the first time as well.
Press the MENU (or ok) button
on the Pronto remote or DPTV. An
on-screen list of NTSC features
shows on the "MAIN MENU".
Select "1ST TIME SETUP" on
the DPTV's Main Menu. (Selected
MENU item is highlighted in RED.)
Press the remote's Menu
buttons to move UP/DOWN and
from SIDE-TO-SIDE within the list
of on-screen features.
Press CH(annel)▲ ▼ and
VOLume (+) (-)
on the DPTV’s
local keyboard to move UP/DOWN
and from SIDE-TO-SIDE within
the list of on-screen features.
Press MENU (or ok) button on
the remote or DPTV to begin
SETUP.
Follow the instructions shown on
the screen to guide you through the
First Time Setup and use of your
new DPTV.
BEGIN
STOP
1
2
3
Continued on Next Page
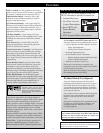
SMART HELP
Note: The Smart Clock
option “SET TIME
AUTOMATICALLY” sets the
DPTV’s clock according to TV
station Data Services Information
(where available). With this mode
the clock will automatically reset
itself after power outages and
update itself for Daylight Savings
Time changes. The Smart Clock
feature will also reset itself every
time the TV is turned off.
The “SET TIME MANUALLY”
option allows you to only enter
the current time of day and AM or
PM settings.
See following page for details on “Set Time Manually”