


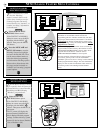
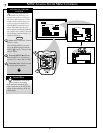
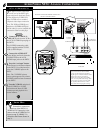
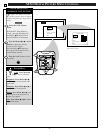

AUDIO/VIDEO NTSC ANALOG CONNECTIONS
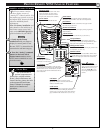
ANALOG
TV ANT/CABLE
AUX 1 AUX 2
S-VIDEO
ANALOG
AUDIO OUT
AUDIO INPUT
AUX 1 AUX 2
VIDEO OUT
VIDEO INPUT
L
R
L
R
NTSCNTSC
++
++
mute
volume
channel
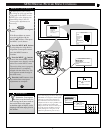
S VIDEOS VIDEO
ANTENNA
OUT
IN
OUT
IN
AUDIO
R
L
VIDEO
IN
OUT
S-VIDEO
OUT
4
1
2
power
DTV
Analog
DTV1/3
sleep
alt audio
status
ext input
freeze
analog format
3
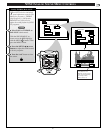
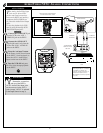
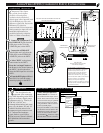
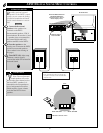
AUX1 - S-VIDEO INPUTS
S-VHS VCR
AUDIO OUT
(RED/WHITE)
S-VIDEO OUT
REAR OF DPTV
PICTURE AND SOUND FROM PLAYBACK OF S-
VHS VCR TAPE PLAYBACK
S-VIDEO
CABLE
NOTE: A CD-i (Compact Disc Interactive)
player, Video Game, or other S-VIDEO
accessory can be hooked up to the DPTV
using this type of connection. Please be aware
that such video sources, which show a
constant non-moving pattern on the DPTV
screen, can cause picture tube damage. When
not in use turn your video accessories OFF.
Also, regularly alternate the use of video
sources with normal TV program viewing.
32
SMART HELP
T
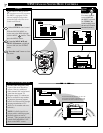
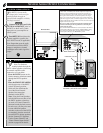
he S(uper)-Video connections
on the rear of the DPTV offer
improved picture detail and clarity
for the playback of S-VHS VCR
tapes or DVDs over a standard
composite video input connection.
Note: The VCR (or DVD Player)
must have a S-VIDEO OUT(put)
jack in order for you to complete the
connections shown on this page.
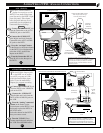
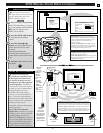
Connect the S-VIDEO (S-
VHS) OUT jack from the VCR to
the AUX1 S-VIDEO input plug on
the DPTV.
The S-VIDEO connecting cable
will be supplied with the S-VHS
VCR (or DVD Player).
Connect the AUDIO OUT
jacks R(ight) and L(eft) from the
S-VIDEO VCR to the AUX1
AUDIO input jacks on the DPTV.
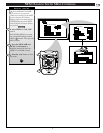
Press the “ext input” button
on the Pronto (or the Source button
on the DPTV’s local keyboard) to
select the S VIDEO input on the
DPTV.
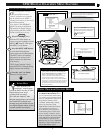
Note: The "S VIDEO" picture
source option appears only when a
S-VIDEO cable has been connected
to the DPTV.
Turn the VCR ON and place it
in the S-VIDEO (or S-VHS)
playback mode. Insert S-VHS
cassette tape and playback in a
normal manner.
STOP
1
2
3
4
BEGIN
Remember, connections
and use of the DPTV's S-
VIDEO AUX2 Input plug is the
same as for the S-VIDEO AUX1
input (except "S-VIDEO 2" is
selected as the Picture Source in
step 3).