


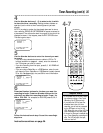

42 Connecting the Controller
If you are using a Cable Box or DSS Receiver, connect the Controller to your VCR. The Controller will
automatically select channels at the Cable Box or DSS Receiver during a timer recording. Leave your Cable
Box or DSS Receiver turned on during a timer recording.
2
Connect the Controller to the CABLE BOX Jack on the back of the VCR as shown above.
3
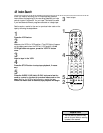
Attach the Controller to the top of the VCR using adhesive tape. Make sure the Controller’s
transmitter (the light on the top of the Controller) is pointed toward the Cable Box or DSS Receiver’s
remote sensor.
4
If you are using a Cable Box, follow the steps on pages 43 - 44 to make the Controller change
channels at the Cable Box during timer recordings.
If you are using a DSS Receiver, follow the steps on pages 45 - 46 to make the Controller
change channels at the DSS Receiver during timer recordings.
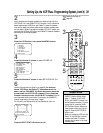
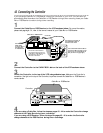
1
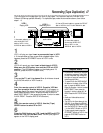
Connect the Cable Box or DSS Receiver to the VCR as shown below. For more information,
please read page eight. Or, refer to the owner’s manual of your Cable Box or DSS Receiver.
Cable Box or DSS Receiver
Controller
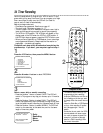
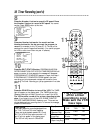
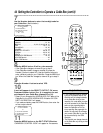
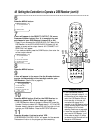
POWER PAUSE
VIDEO
L AUDIO R
VCR/TV
CHANNEL
STOP/EJECT
REW
PLAY
FF
REC/OTR
HQ
H S
OTR
VCR
SP
ST
SAP
AM
PM
SLP
REC
PLAY
TIMER
PAUSE
M
M
Connect the Controller to
the CABLE BOX Jack on
the back of the VCR.
Use an RF coaxial cable to
connect the OUT Jack on the
Cable Box or DSS Receiver to
the ANT(enna) IN Jack on
the back of the VCR.
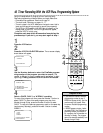
CH3 CH4
RF OUT
ANT.IN
AUDIO
CABLE
BOX
VIDEO
IN OUT
OUT
R
L
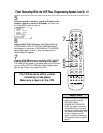
CH3 CH4
RF OUT
ANT.IN
AUDIO
CABLE
BOX
VIDEO
IN OUT
OUT
R
L
IN
IN
Connect the
Cable signal
to the IN Jack of
the Cable Box
or DSS Receiver.
Cable Box or DSS Receiver
Controller
Use a second RF coaxial cable to
connect the RF OUT Jack on the
VCR to the TV's ANTENNA IN
Jack (as shown on page eight).