


Chapter 3 IBM DOS / WINDOWS Driver Installation
3-2 Software Driver Installation Guide / Owner’s Manual
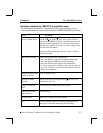
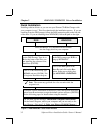
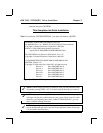
Quick Installation
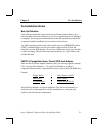
Installing software drivers so you can use your Pioneer CD-ROm Changer with
your computer is easy! This flow chart details the installation process. If you are
installing from the DOS prompt, follow the DOS instruction path on the left side
of the chart. If you are installing from WINDOWS, follow the path on the right.
Insert the IBM-PC & Compatible Driver Diskette
into the floppy drive on your computer.
At the DOS Prompt, Type A: or
B: for the letter of the drive you
are installing the software from,
then Press [ENTER].
At the DOS prompt type WIN to
bring up WINDOWS.
At the A:\ or B:\ DOS Prompt, type
INSTALL and press [ENTER]. This
will begin the Installation Program.
Click on the FILE option in the
Menu Bar and click on the R
UN
option. In the pop-up dialog box,
type A:INSTALL or B:INSTALL.
Note: The screen may go blank for a few seconds while the
program
loads.
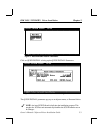
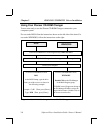
To execute a Quick Installation of the drivers, select the QUICK INSTALL
option from the main menu, accept the default options and press [ENTER].
See the following pages for details about using the installer.
DOS
WINDOWS
Figure 3 - DOS/WINDOWS - Quick Install Process
✓
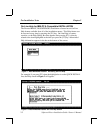
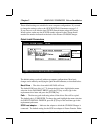
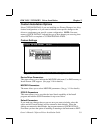
You will then see this message: Installation Completed Successfully!
Exit the Install Program, reboot your computer and you are ready to use
your Changer. (See page 3-9, Using your Pioneer CD-ROM Changer.)