


Copying and backup
09
110
En
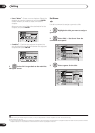
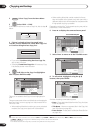
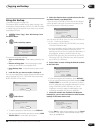
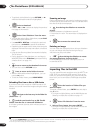
1 Select ‘Copy’ from the Home Menu.
2 Select ‘DVD/CD HDD’.
3 Select a Copy List type.
• Selecting Create New Copy List will erase any Copy
List already stored in the recorder.
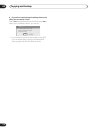
4 Add titles to the Copy List (highlight a
title and press ENTER to add).
Titles you’ve added to the Copy List are highlighted in
pink.
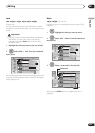
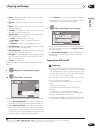
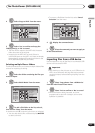
5 Select ‘Next’ from the command menu
panel to proceed to the title edit screen.
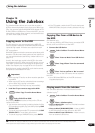
6 Select a title to edit.
A menu appears of Copy List editing commands:
• Erase – Erase individual titles from the Copy List (see
Erase on page 98).
• Move – Change the order of titles in the Copy List
(see Move on page 103).
• Preview – Check the content of a title in the Copy
List.
• Cancel – Exit the menu.
Repeat this step for as many titles you have that need
editing.
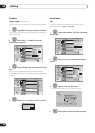
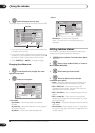
7 Select ‘Next’ from the command menu
panel to proceed to the copy options screen.
• Select Recording Mode if you want to change the
recording quality (see Recording Mode on page 110).
8 Select ‘Start Copy’ to start copying.
Recording Mode
1 Select ‘Recording Mode’ from the
command menu panel.
2 Select a recording mode for the copy.
• High-Speed Copy
1
– The Copy List is copied at the
same recording quality as the original.
• XP, SP, LP, EP, SLP, SEP, MN
2
– The Copy List is
copied at the specified recording quality in real-time.
(Note that if you copy at a higher quality setting than
the original, the copy will not be better quality than
the original.)
If you select MN above, you can also change the level
setting (MN1 to MN32
3
or LPCM) from the
Recording Quality box that appears.
• Optimized
2,4
– The recording quality is automatically
adjusted so that the Copy List fits on to the space
available on the disc. Copying is carried out in real-
time.
When you change the recording mode setting, you can
see how much disc space it will require. If this is more
than is available, it shows up in red and you won’t be able
to start copying. In this case, either change the recording
quality, or press RETURN to go back to the Copy List
screen and erase one or more titles from the Copy List.
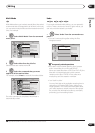
Bilingual
1 Select the title containing the audio you
want to change.
2 Select ‘Bilingual’ from the command
menu panel.
3 Select a bilingual audio option.
HOME MENU
ENTER
ENTER
ENTER
ENTER
ENTER
ENTER
ENTER
Note
1 When copying to a Video mode DVD or DVD+R/+RW, the chapter markers in the copy may not be in exactly the same position as the original.
2 When the copy mode is set to something other than High-Speed Copy for copying to a Video mode DVD or DVD+R/+RW, the chapter markers
of the original are not copied. Chapter markers are put into the copy at regular intervals, according to the Auto Chapter setting (see also Auto
Chapter (Video)) and Auto Chapter (DVD+R/+RW) on page 132.
3 When copying to a DVD+R/+RW, MN1 to MN3 and SEP modes are not available.
4 Optimized mode only available when copying to DVD.
ENTER
ENTER
ENTER
ENTER
ENTER